With domestic travel booming in a big way because of covid, more and more people, including myself are always on the lookout for those untouched, well-kept secret places that we can escape to away from the city and discover more about the land that we live in. Which is how I discovered Vilasa Luxury, a travel portal that creates and curates bespoke travel itineraries just for you that cater to your tastes and travel preferences. I was looking at discovering more about Rajasthan even though I’ve visited it so many times before and boy did they deliver! My friend and I had an amazing road trip from Delhi to Dera Vilage, Kalakho and then onwards to Dera Dune, Jamba and we got to see Rajasthan in a completely new light – right from the warmth of the people, to the middle-of-nowhere locations we got to see, to the food we ate and ofcourse the absolutely brilliant experiences we were whisked away on. We came back so refreshed!
We started with Dera Vilage at Kalakho which is about a 6 hour drive from Delhi. Nestled in an obscure location on the map, the property is in the middle of gourd plantations that get visited by hyenas at nights and witness the local farmers firing their air-guns in the air to scare them away. With 16 cosy cottages, Dera Village almost reminded me of the times I enjoyed the Infantry Officer’s Messes back when my father was still serving in the Army – a close knit family vibe, lush green lawns with an outdoor bar setup, options to play badminton, a pool room equipped with a beautiful fireplace for chilly winter evenings and a common dining area for all the guests to gather and eat together. I LOVED it!
I must make a special mention of how incredible the food at both the Clement Retreats properties was – they mostly use fresh, organic produce grown in their own farms surrounding the properties while the remaining is obtained locally to support the neighbouring farmers. It reminds you of yummy ghar-ka-khaana with unmatched freshness while at the same time introducing you to typical Rajasthani dishes and preparations that you may never have heard of. Brilliant!
Dera Dune, Jamba is another 8 hour drive from Dera Village but can also be easily accessed via Jodhpur if you prefer flying. Again, located smack in the middle of nowhere, atop a sand dune, with 16 cottages and stunning 360 degree views of the land around, you get to witness some spectacular Rajasthani sunsets, have beautiful spaces all over the property to relax by yourself, catch up on some reading and a gorgeous pool as well!
We also got to experience some amazing places like nearby salt pans in a village called Baap, a local potter who opened up his home to us, visitng a weaver’s home where he and his wife hand weave the most on-trend rugs, witnessing thousands of Demoiselle Cranes flying in from Mongolia to stop over in Khichan to feed on Jowar that’s kept for them in a safe enclosure to protect them and help them on their incredibly long migratory journey and ending our stay with a desert camel safari and a beautiful sundowner (with the best banana bread you ever had, no jokes). Can’t wait for you to see the lovely pics from this experience with Vilasa Luxury and The Clement Retreats.
Dera Village
Chilling outside our cottage
Simply amazing to chill in the winter sun with some piping hot potato wedges and beer!
We even managed to get in a game of badminton and multiple games of pool.
Dera Dune in the distance while we went for a sundowner walk to the nearby sand dunes
Our lunch spot under the winter sun on one of the days
Inside the weaver’s home
The nearby temple in Jamba which is absolutely stunning during the sunset
Like I said, the sunsets we got to experience were a thing of utmost beauty.
Our cottage at Dera Dune
It was nothing short of phenomenal to witness these thousands of Demoiselle Cranes in Khichan early morning to come feed and take a short break before flying off in their amazing arrow shaped formations.
At the salt pans at Baap
At the potter’s home
The sundowner on our final evening at Dera Dune. Such a lovely evening spent with Anjali of The Clement Retreats!
Touristy things on our sundowner walk around the sand dunes of Dera Dune Extremely touched by the warm hospitality of the entire staff. It was also very special to be a part of the flag hoisting on Independence Day while we were there. We sang the National Anthem and ate laddoos after. Felt as excited about it all as we used to be when we were kiddos!
If you’ve ever been on a long, cross-country flight, you are likely familiar with the loud hum of the jet engine throughout the journey. Luckily, the introduction of noise-cancellation technology has allowed weary travelers to rest their ears and their eyes on long flights. Likewise, daily commuters are able to use noise-cancellation to tune out the noisy chattering of a train-full of people on their way to and from work.
Yet, despite all of the benefits noise-cancellation offers for travel and daily commutes, there are still many misconceptions about noise-cancelling technology. Some mistakenly consider noise-cancellation capable of attaining complete silence, whether aboard a noisy train or walking through a construction site. The truth is that no noise-cancelling headphone, no matter how good the rating, will fully eliminate high pitch and high frequency sounds, like a jackhammer or screaming baby. Good noise-cancellation is intended to minimize ambient noise, or low frequency noises, such as the hum of a jet-engine, the steady pulse of a moving train or the sound of co-workers bustling around you during the work day.
When shopping for a pair of good noise-cancelling headphones, it’s important that you truly understand what noise-cancellation can do well, and on the other hand, what it’s not designed to do. So, let’s talk a little more about how noise-cancellation works.
ACTIVE NOISE CANCELLING
Headphones contain a miniature microphone that picks up external ambient sounds. By analyzing the background noise, the noise-cancelling circuitry takes note of the frequency and emulates a sound to cancel out the noise. This “destructive interference” allows you to stay focused on the audio you want to hear. This sound reduction technology, however, doesn’t work on all frequencies. While every manufacturer is slightly different, all noise-cancelling headphones operate to reduce low frequency sounds! It’s a case of using fire to fight fire – in this case – using noise to fight noise!
PASSIVE NOISE-CANCELLATION
These headphones do not use any electronic sound reduction technology and as a result, do not isolate lower frequency sound. Just like wearing earmuffs or putting your fingers in your ears decreases the ability to hear, the materials of the headphones themselves block out some sound waves and decibels (which is a unit of measurement for sound intensity). Passive noise-cancellation can minimize some high frequency sound, however, it will only be muffled depending on the thickness and composition of the material in the ear-cups.
Many active noise-cancelling headphones also feature passive noise-cancelling qualities, including many of Phiaton’s product offerings. Phiaton’s active noise-cancellation technology allows for as much as 95% noise reduction of low-frequency sounds in products such as their BT 120 NC earphones and and 900 Legacy Digital Hybrid headphones. The 900 Legacy also offers additional passive noise-cancellation through the density of its memory foam earcups.
To sum it all up, noise-cancelling headphones are most successful at reducing low frequency background noises, such as commuter and travel interference. You’ll find yourself needing them on planes, crowded offices or anywhere you just want to lessen the noise around you. With so much ambient noise surrounding us, it’s become difficult to enjoy the music-listening experience when dealing with the environmental fracas of our everyday lives. This is why the need for a pair of noise-cancelling headphones has become essential for the modern audiophile and in 2021, the ability to work from home when the whole family is around.
Disclaimer: If you purchase items through links on our site we may earn a commission.
Does your dog nip, growl, snarl, snap or bite? Lunge and bark at other animals or people? Do you think your dog might injure someone or another dog? Does he eat rocks or other inedible things? If you answer yes to any of these questions, your dog needs a muzzle. Don’t wait for a bite or foreign body surgery before getting your dog muzzle trained.
What is a dog muzzle?
Dog muzzles are similar to masks but with holes, designed to prevent a dog from engaging in dangerous behaviors like biting. They’re a tool to keep everyone safe and help with training. Dog muzzles are mainly for short-term use (i.e., while undergoing a training or behavior modification) or for specific purposes like vet visits or on walks.
Why do dogs need a dog muzzle?
Dogs can benefit from muzzle training since sometimes vet visits, nail trims or even new environments or introductions to new species (like your new backyard chickens) can be challenging and your dog can be provoked to bite or lunge. But let’s face it: we don’t see many dogs wearing what seems like some sort of medieval torture device. And if we do, we might stereotype muzzle-wearing dogs as aggressive, and wonder what the heck the owner was doing to the dog that he needs a cage on his face. But dogs who wear muzzles aren’t “bad dogs,” they just need space.
Dogs who wear muzzles could be struggling with any number of issues like:
fear
anxiety
stress
medical issues
Melissa Hatfield, certified behavior consultant and trial consultant for bite cases, says muzzles provide an extra level of safety during the training process. But for some dogs, wearing a muzzle may be a lifelong commitment in certain situations like going for a walk, when the small children come over or even visits to the vet or groomer. As much as training can reduce the potential for risk, there are some dogs who will never be reliable enough to go without this safety net, says Melissa.
Do not use dog muzzles for barking or chewing
Muzzles are not for barking, chewing or other troublesome behaviors. Oftentimes these behaviors are the result of lack of stimulation and exercise or other needs not being met. Certified dog trainer Cindy Martin says a muzzle is not a substitute for addressing the physical and emotional needs of the dog. And without behavior modification and affirmative training, a muzzle can stress the dog and make things worse, says Cindy.
How to find the right muzzle for your dog
Before training your dog to a muzzle, be sure you get the proper type and fit. Muzzles should fit securely yet comfortably. A properly fitted muzzle should feel to the dog like wearing a pair of glasses feels to us — like it’s not even there.
Basket muzzles are popular since they allow for dogs to pant, receive treats and drink. They’re also light-weight, flexible and inexpensive. A popular choice is the thermoplastic rubber Baskerville dog muzzle, which is also adjustable by submerging it in hot water.
My dog Apache’s muzzle is custom made of biothane by BUMAS.
Pricey, but since he wears it every time he leaves the house, and it’s made especially for him, it was worth it. It accommodates his full pant, drinking and treats. I was also able to select the colors and added security features. A similar less expensive option is made by Trust Your Dog.
If you have an extra-large dog or one with a slim, long snout, the vinyl Jafco dog muzzle is a great option.
For dogs who are a bite risk, wire basket muzzles, such as the Leerburg dog muzzle, can be a safe choice.
Avoid cloth and Velcro muzzles that force a dog’s mouth shut and restrict necessary functions.
How to get your dog to wear a muzzle
Take the time to train your dog to enjoy wearing his muzzle. If your training is blah your dog will be blah about the muzzle; you need your dog to feel like he’s at a rave or a rock concert when he sees the muzzle, not a black-tie affair.
If trained properly, your dog will voluntarily place his snout into the muzzle. Don’t force it onto your dog’s face! Muzzle training done right should take a few weeks. Cindy’s favorite tip is to first acclimate the dog to the sensation of putting his muzzle into a closed space using a cottage cheese or one quart yogurt container with the bottom cut out. Feed awesome treats from the cutout end, building duration.
Muzzle training isn’t as easy as teaching sit or rollover but should be just as fun and well reinforced. Take your time with each step.
Here is our step-by-step guide to dog muzzle training:
Put food inside the muzzle and set it up in a box/bowl and let him eat. Any hesitation, stop and go back to the previous step. Up your pay game if you have to: chicken, liver, tripe, cheese, steak, whatever. You want the muzzle to have wow factor! Do this for at least a week ideally at least a couple times per day. If your dog’s totally cool (not just kind of cool, but super-pumped cool) when he sees the muzzle, you’re ready for the next step; if not, stay here. Keep at it until you see a happy dance from your dog when you bust out the muzzle.
Next, invite your dog to place his snout inside the muzzle and feed from the outside. DON’T force it — if he’s not putting his snout in voluntarily, back up a step.
At the end of the second week, you should be able to attach the straps for a second or two, then release.
By the end of the third week, you’ve worked up to longer periods of wear: some yard time, a short walk, or while you return a few emails. Whatever, just so he gets used to having it on for longer periods.
If your dog’s not happy-dancing, back it up a step, break out the million-dollar treats and work to get the rockstar reaction you need to get the all-in from your dog.
Muzzled dogs should always be supervised.
Take the muzzle off before signs of frustration or annoyance (i.e., reluctance to putting his face in voluntarily, pawing, etc.).
If he paws at the muzzle once it’s on, back up to the previous step of success and work there. But don’t remove the muzzle while he’s pawing at it- you don’t want to reward the pawing behavior.
While muzzles are a great management tool, they’re not a substitute for training. If your dog is displaying troublesome behaviors first address the underlying emotions causing these behaviors. Rewards-based trainers, behavior consultants and even veterinary behaviorists can help.
Muzzles keep everyone safe and help dogs (and humans in many cases) enjoy a greater quality of life. Melissa says having the option of wearing a muzzle can give dogs freedom to experience a variety of situations they normally wouldn’t be able to while adding an extra layer of safety for all concerned.
Truth be told, long before I became a trainer, I was one of those open-mouthed gawkers when I saw a muzzled dog. But several years ago, I adopted Apache, a long termer at a rural shelter who will always wear his muzzle in public. And that’s okay. Muzzles keep everyone safe. And at the end of the day, that’s the most important thing.
It can’t be said enough how kitchen island dimensions are an important part of a kitchen remodel job. all want to make our houses the best that they can be.
View in gallery
But did you know that homeowners spend an average of two hours a day or almost 800 hours each year in the kitchen? Yes, even if they don’t cook.
View in gallery
The National Fire Protection Association (NFPA) recently updated the regulations on how many receptacles a kitchen can have. NFPA officials said, “The requirement is to install one receptacle outlet for the first nine square feet and then one for each additional 18 square feet or fraction thereof.”
The amount of work required to install a kitchen island doesn’t cost as much as a bedroom or living room but does require intensive labor.
A kitchen island is a freestanding cabinet placed in the center of your kitchen. You should be able to walk around the cabinet and use it for a variety of purposes related to the kitchen.
The most important part of a kitchen island side is the relativity to your kitchen. You will need at least 36-inches clearance for a comfortable kitchen with 42-inches being recommended for a comfortable kitchen.
Kitchen Island Height
The standard height for most kitchen islands is 36 inches. This is a good height because it is the same height as most countertops. Kitchen islands often look the best when they are the same height as the countertop of the cabinets.
Although the height varies depending on what the use for the island is. For example, if you are going to be standing at it more often, slightly higher is good. If you are going to add barstools, then allow two feet of clearance between the two.
Kitchen Island Width
Most kitchen islands are two to four feet wide, or deep. Two is a good minimum because any less than that and the island no longer serves a purpose. If you do have a narrow island, you can add to it.
In this case, you raise the short area that will be used for eating and add another area that is 36-inches high. They don’t even have to be attached or built-in, they can be separate areas that are pushed together.
Kitchen Island Length
The length of the kitchen island is very important compared to the other measurements because it doesn’t affect the quality of life as much. However, a minimum of four feet is usually the standard for kitchen islands.
If you want a long kitchen island then you should probably go for six feet or more. Any less than four feet and you have a three-foot island that is the same length as your stovetop, which may look odd.
Kitchen Islands For Dining
View in gallery
There are two types of kitchen islands. There are those that are designed for bars that will be used for displays and cooking activities then there are those that will be a designated eating place for the family.
Kitchen Island With Seating For Two
View in gallery
This is a common island size if you want a small kitchen island. It will seat two people comfortably by adding two barstools. This is the minimum size for a kitchen island and is not a long kitchen island.
The kitchen island with seating for only two people will be four feet long. This is a standard kitchen island for small kitchens and works fine if you have two people that will sit at the island at the same time.
Kitchen Island With Seating For Three
View in gallery
You can get by with a kitchen island, with seating for three people, that is five feet long, but this will be just a wee bit scrunched. It is often the standard for kitchen island sets that aren’t built-in though.
For built-in sets, you can expect about six feet long which is considered a long kitchen island. But you can’t get much longer than that or else the seating will look strange spaced out a foot apart or more.
Kitchen Island With Seating For Four
View in gallery
Now if you have a very long or large kitchen and have a kitchen island then your island is probably at least six feet long, probably seven or eight-foot-long. It’s standard for each person to have at the very least 20-inches of space.
This is for narrow stools. For wider stools or actual chairs, more room is necessary. If you are lucky enough to fit an eight-foot-long kitchen island in your home then you are lucky and should take advantage of it.
If you want a different kitchen island than the ones you see at every store, perhaps you need to design your own. You may want to build it from scratch and you may want to transform your old one.
Now, this kitchen island inspired me! Jen Woodhouse used 2x4s and 2x6s for the main frame before adding small slats for support shelves.
She then added a 2×6 countertop and painted the entire thing. The end result is gorgeous with the dark shelves contrasting the light legs of the kitchen island.
Have you ever thought about taking a piece of furniture that is made for one thing and using it for something else? Most people don’t think about something this drastic when they imagine repurposing something.
But that’s exactly what Old Country House did. They took an old desk and decided to transform it into a marble-top kitchen island with a pretty blue base. The transformation is so remarkable that you would never know where it came from.
Golden Boys And Me has inspired us with this farmhouse kitchen island. They started out with a simple IKEA bookshelf and ended up with a farmhouse kitchen island that anyone would be jealous of.
The best part is that it was a simple project that anyone can do too. All you need is a drill and you too can have this exact island. Or, use this as inspiration and transform your own piece of furniture.
There isn’t much that is more satisfying than finding a Craigslist item and transforming it into something worth ten times what you bought it for. This is just proof that you don’t need money to make your house look like a million bucks.
All that Fresh Mommy did was give this island a fresh coat of paint and added a new countertop. Pro tip? You can buy countertops on Craigslist or Facebook Marketplace for next to nothing as well.
Sarah of Thrifty Decor Chick lived up to her name with this kitchen island project. Or should I say these kitchen island projects? She is known for transforming kitchen islands over and over again.
She does it so often that it can be impossible to pick a favorite. The girl works with any type of decor and can make anything look good. If you are looking for general inspiration then look no further than this Thrifty Chick.
Did you know that you can take kitchen cabinets and transform them into a kitchen island? Most people didn’t! Classy Clutter does an amazing job of taking standard kitchen cabinets and creating an island.
When they finish, it’s hard to believe that what looks like an expensive Wayfair find is a kitchen cabinets that saved them a lot of money. Who doesn’t want to try this as soon as possible now?
Who said that high-end islands had to be big and flashy? Nevertheless, they were wrong. Ashley of Little Glass Jar turned a small bookshelf into an adorable kitchen island that we all need in our kitchen.
The best part about small kitchen islands like this is that they work for small or large kitchens. You can put it in the corner and use it as a roll-around cart or you can just get a taller one and put it in the center.
This classic kitchen island is amazing! Shades Of Blue really outdid themselves with this one. On their island, they made half of the island open shelving with attractive teak-like slats with the other half a trash holder.
No one likes their trash can out in the open but it often seems that anything else isn’t an option. This team figured it out by adding a compartment that will safely hold their trash without it being seen.
You may not think that paint has enough power to transform a kitchen island. The primary thing that Artsy Chick Rules did to this island is painted it. The difference it made is astounding.
This just goes to show you that you don’t need a lot of experience or huge ideas to make a huge difference. You can start small and think outside the box and you can transform any kitchen island into something special.
Frequently Asked Questions (FAQ)FAQ
What Is The Average Kitchen Island Size?
A standard kitchen island is 40 by 80 inches. The size of a kitchen island is determined by the space around it. With proper space, you can’t have a kitchen island.
Do Kitchen Islands Have To Be Anchored?
It is not mandatory for a kitchen island to be anchored to the floor. However, if safety is a concern, anchoring the island to your floor will provide greater versatility. If you want a rolling kitchen island, they work best in small kitchens.
What Is The Best Countertop For A Kitchen Island?
The best countertop for a kitchen island is stainless steel. With this countertop, you wouldn’t have to worry about rust or corrosion. Stainless steel is heat resistant, and won’t scratch or stain.
What Is The Standard Overhang For A Kitchen Island?
A kitchen island is the centerpiece of your cooking space. When installing an overhang, it must be perfect. An average countertop overhang is 1.5 inches.
Should I Install A Sink In My Kitchen Island?
A sink wouldn’t help your kitchen island. Clutter would become an issue, and before you knew it you’d have dirty plates stacked in your sink. Plus, they seem to be more trouble than they’re worth.
Kitchen Island Dimensions Conclusion
How much space you have will determine the size of your kitchen island. Truer words have never been spoken. If you follow the kitchen island size guidelines and you won’t have any problems.
Your counter space should have enough room for you to prepare meals. If you already have too much space, then an island would be a great idea for your kitchen. You could even add barstools and turn your island into an informal table where your family could sit comfortably and eat together.
After you’ve measured your kitchen, make sure you leave plenty of space for elbow room. Walking space is also important, so plan accordingly.
To migrate all your emails from Outlook to Gmail, you’ll need to link your Gmail and Outlook accounts.
Once you link your accounts, all your email will migrate and you can manage your Outlook account through Gmail.
If you aren’t going to use Outlook anymore, you can perform a one-time migration instead.
Gmail is the most popular email service in the world, but Microsoft Outlook has its fair share of dedicated users too. And if you use both apps, you don’t have to live two separate lives — you can connect your accounts and migrate all your Outlook emails to Gmail.
Here’s how to migrate all your emails from Outlook to Gmail, whether you’re still using that Outlook account or want to abandon it.
How to migrate emails from an active Outlook account to Gmail
This is for anyone who wants to keep using their Outlook account alongside the Gmail account. To do it, you’ll need to link your Gmail and Outlook accounts.
Linking the accounts lets you see your Outlook emails in the same inbox as your Gmail account, and they’ll be available on every device. When you delete an Outlook email in Gmail, it’ll delete from your Outlook account too. The accounts will sync every 10 to 20 minutes to fetch new emails.
You’ll also be able to send emails from Gmail using the Outlook account. When you’re composing an email, just click your name in the From field to pick the sending account.
You can link your accounts using the Gmail website or mobile apps.
Using the Gmail website
1. Open the Gmail website and click the gear icon in the top-right, and then click See all settings.
2. Open the Accounts and Import tab. Next to Check mail from other accounts, click Add a mail account.
Add your Outlook account to Gmail.
Google; William Antonelli/Insider
3. Enter in the Outlook address you want to link and click Next.
4. When you’re asked if you want to link accounts using Gmailify or import mail using POP3, select the Gmailify option.
5. A pop-up will appear asking if you want to give Gmail permission to access your Outlook account. If your browser’s pop-up blocker stops it, disable the blocker and try again.
Once you give permission, Gmailify will link the accounts, and you’ll have access to all your Outlook email in Gmail.
3. Once you’ve got a Gmail account set up, tap your user icon in the top-right corner and select Add another account from the menu that appears.
Make sure you’re logged into the Gmail account you want to link with Outlook.
Google; William Antonelli/Insider
4. Select the Outlook, Hotmail, and Live option.
5. You can choose whether you want to link the accounts using Gmailify or not. Using Gmailify will configure your Outlook account’s folders and spam filters to act like Gmail’s.
6. Type in your Outlook address and log into it using the Microsoft page that opens.
Let the accounts link. Once they’re done, you’ll be able to check your Outlook emails in the same inbox as your Gmail messages.
How to migrate emails from an old Outlook account to Gmail
If you want to stop using Outlook and start using Gmail exclusively, you can perform a one-time import of all your Outlook emails. This will migrate over all your existing Outlook contacts and messages, and will also keep an eye on your Outlook account for the next 30 days in case any late messages come in.
2.Open the Gmail website and click the gear icon in the top-right corner, then select See all settings.
3. In the menu that appears, click the Accounts and Import tab near the top.
4. Next to Import mail and contacts, click Import from another address.
Instead of adding an account, we’ll import it.
Google; William Antonelli/Insider
5. Type in the Outlook address that you want to migrate your mail from, then click Continue.
6. On the next page, click Continue again and give Gmail permission to access your Outlook account. If you have a pop-up blocker enabled, you might need to disable it and then start the process over.
7. Once they’re linked, select what you want to migrate over from Outlook: Contacts, mail, and/or new mail for the next 30 days. We recommend selecting all three.
You should select all three options.
Google; William Antonelli/Insider
Depending on how much mail you had in the Outlook account, this could take a while. Once it’s done, a message will appear at the top of Gmail telling you that the import is complete.
All your Outlook mail will be kept in a separate folder, but you can freely move those messages however you want.
This is a one-time migration, so once it’s complete — or if you picked the new mail option, once the 30 days have passed — Gmail disconnects from Outlook. If you missed anything, you’ll need to run the import again.
William Antonelli (he/she/they) is a writer, editor, and organizer based in New York City. As a founding member of the Reference team, he helped grow Tech Reference (now part of Insider Reviews) from humble beginnings into a juggernaut that attracts over 20 million visits a month. Outside of Insider, his writing has appeared in publications like Polygon, The Outline, Kotaku, and more. He’s also a go-to source for tech analysis on channels like Newsy, Cheddar, and NewsNation. You can find him on Twitter @DubsRewatcher, or reach him by email at wantonelli@insider.com.
“Slugging” has been around for years (and may even be something your mom still does), but it recently exploded on TikTok thanks to K-Beauty. With almost 280 million mentions of slugging on TikTok, it may be the internet’s favorite viral skin care hack, but is this much-loved treatment for everyone? Let’s investigate the slugging skin care trend together.
Slugging involves coating your face in a petrolatum-based product like Aquaphor, or Vaseline or, for a ‘cleaner’ alternative, a thick (petrolatum-free) lipid balm such as our Rosehip & Lemongrass Repair Balm, before going to sleep.
The rationale for slugging is that the balm (in skin care terms: an occlusive) acts as a physical barrier, sitting on top of your nighttime skin care routine, sealing in any hydration and preventing moisture loss.
According to the Mayo Clinic, lipid balms like petroleum jelly, act like a greenhouse and insulate the skin “so that it doesn’t lose heat and doesn’t lose moisture.” Any hydration you’ve applied during your skin care routine will be fully absorbed into the skin rather than evaporating overnight.
Slugging also supports the skin’s moisture barrier. Increased hydration means your skin is better prepared to defend against irritations or allergens that can cause blocked pores or breakouts. A healthy barrier also means faster recovery from any breakouts that do occur.
Slugging is not something we recommend to everyone. It’s a great step for those with a dry skin type and dehydrated skin. However, for those who are more breakout prone or have an oily skin type, we would suggest the occasional slugging treatment (every couple of months if needed) or not at all, as slugging may increase breakouts for oily skin types.
Slugging isn’t a miracle treatment for everyone. The AAD recommends avoiding petroleum jelly or thick occlusives if you’re prone to acne or breakouts. Although petroleum jelly is non-comedogenic, such a thick layer can trap dead skin cells and dirt, the perfect conditions for breakouts.
While those with dry skin may love the slightly oily residue that slugging can leave you with, oilier skin types may want to avoid trapping any extra oil. If your skin is acne prone or on the oilier side, consider an alternative to slugging. Layering a hyaluronic acid-based serum with a thicker face mask is a hydrating option that won’t clog your pores.
Although the name slugging is new — the practice is not. Korean, Afro-Caribbean and European beauty practices have used variations of skin slugging for generations — slugging the skin on the face, hands, feet, eyelids and lips to reduce dryness and encourage product absorption. It’s also common to see the practice applied by professionals after micro-needling or chemical peel treatments, or as a relieving salve for those with eczema or psoriasis.
Results From Slugging
After a nighttime routine of slugging your skin, you should wake up with healthy, smooth-looking skin that has been hydrated through the night and is less likely to wrinkle or develop fine lines. The process works to prevent transepidermal water loss, to keep moisture in your skin and enhance the effects of the skin care products you’ve applied to your face.
Who Should Do Slugging and How Often?
Slugging is best for drier skin types, mature skin, or those who feel dryness through the cooler seasons. The practice is especially beneficial though winter when temperatures drop and the skin barrier is compromised or at risk.
Each person should slug according to their preference of product thickness. Start with a cleansed face and follow as many steps of your skin care routine as you desire. Finish up by adding a few dabs of your slugging product and build up to a blueberry-sized amount. Apply once or twice a week (or even daily) depending on how dry your skin feels and how your skin reacts. But, always patch test before applying to the whole face. We have a more thorough routine explanation in this In The Mix video below.
Now, let’s move on to a slugging routine (wait for the final step for the slugging part!).
How To Slug: Sleep Hydration Focused Nighttime Routine
Start about 30 mins before heading to bed.
1. Cleanse your skin. Gently cleanse with the Firm Skin Acai Cleanser, an ultra-hydrating way to remove impurities from the skin.
2. Exfoliate for extra smoothness. The Strawberry Rhubarb Dermafoliant contains plant extracts to smooth the appearance of the skin without stripping any moisture.
6. Apply a face oil. We love the Camellia Glow Solid Face Oil — warm up a small dab in your palm and smooth over the entire face.
7. Time to slug! Take a blueberry-sized amount of the Rosehip & Lemongrass Repair Balm, melting it first in your hands, and evenly rolling it over the face. Containing shea butter and beeswax, the balm will act as a coating to lock in hydration and prevent moisture evaporation from the skin. Leave the product on while you sleep.
8. In the morning, use your cleanser to remove any morning-after residue, or simply rinse the face with water to start with a clean base for the day ahead.
My Experience
As someone with year-round dry skin who really feels the dry air through the cooler months, slugging played a big role in my skin care routine this winter, and I happily jumped on the trend. Every second night, I applied my serum, moisturizer and facial oil before smoothing out a blueberry-sized bit of Rosehip & Lemongrass Repair Balm across my nose, forehead and cheeks.
I cruised through winter with glowy, moisturized skin — which I preferred over the dry, flakey and sometimes peeling winter skin I’m used to experiencing. As the weather gets warmer though, the need to slug has reduced, and I’m now slugging once or twice a week max.
Other Considerations
1. Potential For Pillow Staining
If you sleep with a silk pillow case, consider switching back to your cotton pillow case on a slugging night, or sleep with a soft towel over your pillow.
2. Strategize Your Skin Care Routine
Adding slugging into your routine may require some planning as you will want to avoid using any actives, such as AHAs or BHAs, or retinoids on a slugging night. Due to the glasshouse effect we mention above, sealing in products intensifies the effects of some skin care products, especially chemical exfoliants. However, layering gentle moisturizers or hydrating serums while slugging is fine.
3. Cleansing Beforehand Is A Must
Removing makeup and dirt is an essential step before you start layering and sealing — you don’t want to trap any debris or nasties that you accumulated throughout the day.
4. Hair Up!
Unless tomorrow is hair wash day, we’d recommend tying up long hair and pinning back your fringe to avoid waking up with oily hair stuck on your face.
Have you tried slugging or do you swear by another viral trend? We would love to hear about it! Let us know on our social media, or in the comments below.
I have already started dreaming of my travel plans in the spring. With travel planning comes the very exciting activity of shopping for your travels! I’ve really been in the mood to indulge in some lingerie shopping to look and feel fashionable during my vacations! Isn’t that what lingerie really is for!? I stumbled upon the amanté Lingerie website and found some really lovely styles that I think I’m gonna be picking up for myself. I’m sharing my favourite picks here that I believe will cover all sorts of moods/occasions and needs for all women. 6 Amante panties and 6 bras that will have all your lingerie needs met perfectly.
Classic Sleek Bras Love the stripe details on the red bra here…makes it seem very chic and sleek. And a nude color underwire padded bra is so essential in any woman’s wardrobe. I usually wear mine under anything white or literally anything else like all the fun tee-shirts that I’ll be wearing while travelling. It is the most versatile piece of lingerie you’ll carry while on vacation.
Fancy & Fun Bras for Different Moods This halter top style lacy bralette makes for a fun element in your look. You can wear a slouchy t-shirt that tends to fall off the shoulder…a bit to show a hint of the blue lace. So good! Or you can wear the bralette as a top.. A strapless bra is another must-have in everyone’s wardrobe. And red is a super fashionable and a classic colour. Meant for your strappy or off-shoulder dresses that you will be wearing for all your sundowners.
I have a personal bias for non-padded, lacy, underwire bras which is why this red one makes it to my list 🙂 . Also, personally, non-padded bras are so much easier to pack because you can fold them flat with the rest of your clothes. This cool, basic, solid black bra has a Moisture Management Technology in place which makes it sweat absorbent and regulates moisture, keeping you fresh all day long. A great piece to carry for when you know you will be out all day exploring new places and need a bra that will carry you throughout the day.
Panties This red panty matches the first bra I shared, and a matching pair is another must-have in your wardrobe. And a black lacy one is a must have, they are trendy and fun! A black lacy panty is great under any black outfit all the while making you feel uber comfortable underneath.
A cute, ditsy floral print panty to keep things light. I’d ideally wear this under casual jeans. And a nude color lacy panty – another essential that everyone must have. Goes best under white/skin color or literally any color outfits.
I like high-waisted panties because they tend to conceal any waist bulges that you may not be happy with and make all the contours smooth 🙂 . Will go perfectly under the high-waisted jeans I like to wear most of the time while travelling. I like the purple panty mostly for its unique color! Always fun to carry a different color for a pop.
Poly recently launched its Voyager Office Base as an additional accessory, for those who own a Poly Voyager Focus 2 Office, will find this item very familiar as is the same base that yo used to find in that particular model. The reason of this is that the end user can get another base and keep using the headset in the office, out the office or wherever has the need to use the headset with either desk phone and/or computer without sacrificing performance in their headsets. The Poly Voyager Office Base allows a user to either use the base with their Poly Voyager 4310 , the Poly Voyager 4320 and/or Voyager Focus 2!
Now the important thing. We will show the steps needed in order to Pair your Base to your headset. Special mention here is that once you pair either your Voyager 4310/4320 or Focus 2, the Voyager Base takes the place of the Bluetooth USB Dongle and is no longer needed to use it with the computer, so feel free to store it in a proper place. The Base acts as the Bluetooth USB dongle, plus with an extra range.
How to Pair the Poly 4300 Base to your Poly wireless Headset:
To put your headset in pair mode, slide and hold the Power switch away from the off position until you hear “pairing” and the headset LEDs flash red and blue.
Put your base into pair mode by pressing and holding the Bluetooth pairing button on the back of your base for 2 seconds until the display panel’s Bluetooth icon flashes blue and red.
Pairing is successful when you hear “pairing successful” and “base connected” and the display panel’s Bluetooth icon turns solid blue.
Imagine being picked up by a stranger and transported to a completely new world, where everything is new to you. Everything you see, hear, touch and smell is scary. That’s what happens when you bring a new puppy home. Your world is foreign and maybe even a bit scary to her. This is why puppy playtime is important: to socialize your dog! During puppy development, your dog is learning what the world is, either full of fun things or scary things. It’s up to you to do everything you can to properly socialize your dog to a wide variety of people, dogs and anything else she may encounter during her life so that she sees the world as a wonderful place to be and can relax within your home.
What is puppy playtime?
Puppy Playtime is really a training session where you are working with your puppy to socialize her with other dogs, people and things. Puppies have a critical socialization period from birth to about 12 to 16 weeks, explains Dr. Carley Faughn, a certified applied animal behaviorist with a PhD in Cognitive Science focusing on animal behavior and cognition, who works as a senior strategist at Best Friends Animal Society.
During that time, it is essential that your dog be exposed to as many things as possible. The key, however, is to have those exposures be positive, says Amanda Cornell, a Certified Professional Dog Trainer-Knowledge Assessed and owner of Accomplished Canines.
Both Accomplished Canines and Best Friends Animals Society offer robust puppy playtime programs to help socialize young dogs and get them started on the right paw in life. At Best Friends, littermates are brought into a sanitized room each day. During their playtime, volunteers come in to act as friendly strangers. Some with sunglasses. Some with hats. Some tall, some short. Puppies are also introduced to things they may encounter in their everyday life, such as the vacuum, umbrellas, bikes, etc.
The key is to make these interactions positive, so your puppy learns to like meeting new people or can sleep through the vacuum cleaner. To do this, pair something the puppy likes with these new experiences. Reward your puppy with a food reward when she goes toward a stranger or checks out the vacuum (turned off at first) or hears the microwave door open and shut, Dr. Faughn says. Some puppies may also like petting as a reward. Others may need higher rewards, like chopped-up hot dog or cheese, if they are more nervous or stressed, she adds.
A positive association with handling is another key to puppy playtime. Dr. Faughn says to introduce your puppy to collars, leashes and harnesses, as well as being touched everywhere and being picked up. For some puppies, these things are no big deal. For others, you will have to go slow and offer high rewards. For example, you may have to reward your puppy for just looking at the collar at first, working up to her being OK with it going around her neck.
We do a lot of strange things with our dogs that we expect them to be OK with — from taking car rides and wearing clothes to getting vet checkups and chilling out on the couch to a loud movie. Puppy playtime is important in order to create that well-adjusted, laid-back dog everyone wants, Amanda says.
Steps to socialize your dog with puppy playtime
All this puppy socialization may seem overwhelming to you. But really, it’s just taking a few minutes each day to expose your puppy to something new. Here are some steps to socializing your dog with puppy playtime:
Have puppy playtime daily.
Make sure all interactions are positive for your puppy. Reward her and pay attention to her body language so you know if you have to change the situation if she is getting stressed or anxious.
Have a checklist so you can keep track of what and who you have exposed your puppy to, Dr. Faughn suggests. This is also a good place to keep notes if you need to remember what your puppy had a hard time with so you know to work more on that.
Don’t stop socializing at 16 weeks of age, when the critical period is over. This training should continue into adult and, for some dogs, longer.
Don’t overwhelm your puppy. Things like “puppy parties,” where you invite everyone over to meet your new dog, can actually overwhelm them Dr. Faughn says. It’s better to just have a short visit with one or two people, or one friendly dog.
Keep playtime short. Puppies have short attention spans and do best with short, positive sessions.
Focus on just a couple things at a time. Rather than try to expose your puppy to everything at once, pick two or three things each day to work on.
Why is socializing with dogs important?
Finally, don’t forget that your puppy also needs to be socialized to other dogs. Usually, puppies get socialization from their mom and littermates for the first eight weeks of their lives, Dr. Faughn explains. But that doesn’t mean they don’t need continued interaction with other dogs.
Socializing with other dogs teaches them social skills, like how to navigate different dog personalities and play styles, Amanda explains. These are vital lessons so your dog can be a good canine citizen around other dogs. When dogs interact, the adults will correct puppies, teaching them the lessons they need to socialize properly throughout their lives.
Whether you are socializing your dog with people, things or other dogs, it’s important to learn dog body language (check out this poster of dog body language that you can buy) so you can tell when your puppy is stressed or nervous at any time. If she is, put space between her and whatever is making her nervous and/or up the reward so you can help her overcome her fear. Otherwise, those fears will stay with your dog throughout her life and may even get worse.
When can puppies start socializing with other dogs?
Because the critical socialization period ends between 12 and 16 weeks, start socializing puppies with other dogs immediately, Amanda says.
But what about vaccines? Recent findings from the veterinary field shows that puppies typically are fully vaccinated at 16 weeks, when they get their last round of shots, Dr. Faughn says. She adds that it’s best to talk to your vet about any concerns you may have.
So, what do you do until 16 weeks so you can still socialize your puppy with other dogs? The best thing to do, if they cannot interact with their littermates, is to find puppies on the same vaccination schedule — or close to — or fully vaccinated, dog-friendly adult dogs, Dr. Faughn says.
Setting up playdates for your puppy
Puppy playdates for dog socialization must be done safely. This means making sure all dogs are vaccinated and that any dog you are introducing your puppy to is known to be dog-friendly. If you are not sure if a dog is good with puppies, put your puppy in an X-pen (an enclosed exercise pen) at first, Amanda suggests. This way, both dogs can be off leash, but there is a barrier to protect your puppy until you are sure the other dog is well-behaved around puppies.
Are dog parks good for socializing puppies?
Socializing dogs is a tricky business. You do not want your puppy attacked or frightened. Meeting one friendly dog at a time is best. This is one of the reasons why dog parks are not a good idea for puppies. They can become quickly overwhelmed if a rush of adult dogs comes at them. Dr. Faughn also points out that dog parks are full of disease and germs that your puppy is not vaccinated for yet. Pet parents often do not watch their dogs very closely at dog parks either, which can lead to trouble if a dog decides to play rough or gets aggressive with your puppy.
Is puppy playtime important?
Puppy playtime is a necessary and crucial part of puppy raising. All pet parents need to make sure they are doing everything they can to help their puppy grow into a well-socialized adult dog. Of course, you can do all the right things and still end up with a dog who is nervous about some things or becomes reactive. This is due to the fact that their genetics, including temperament and instincts, play a role in their personality, as does whatever they experienced before they came into your home, Dr. Faughn explains. The best thing you can do if you encounter something you are not sure about is to remain calm yourself — if you get anxious, your puppy will just be more stressed — and get in touch with a certified dog trainer who uses positive reinforcement techniques. To find a certified trainer in your area, check out the Certification Council for Professional Dog Trainers.
Kitchen cabinet door styles can often be overgeneralized without providing homeowners with a full-picture understanding. This certainly seems to be the case with raised panel cabinets and their flat panel counterparts. In this article, we highlight these two common cabinet styles – explaining their differences, as well as the pros and cons of each – without emphasizing current trends.
Some might say that raised panel cabinet doors are more “traditional,” while flat-panel options like shaker-style doors are more “timeless.” We find both kitchen cabinet door styles stand the test of time and work well in a variety of kitchen design styles.
While we can go on and on about the tenets of timeless design, only you know what’s most appealing to you. Your personal design preferences and style are the most important aspect to consider for your new kitchen. So, one essential question to ask before starting a kitchen remodeling project is: what design style do you think you’ll enjoy for decades to come?
Case in point: Shaker-style cabinetry is trending right now because they’re popular among homeowners interested in creating a transitional design look or honoring the classic looks of a farmhouse kitchen. But, keep in mind that all kitchen design trends ebb and flow, and every kitchen is different.
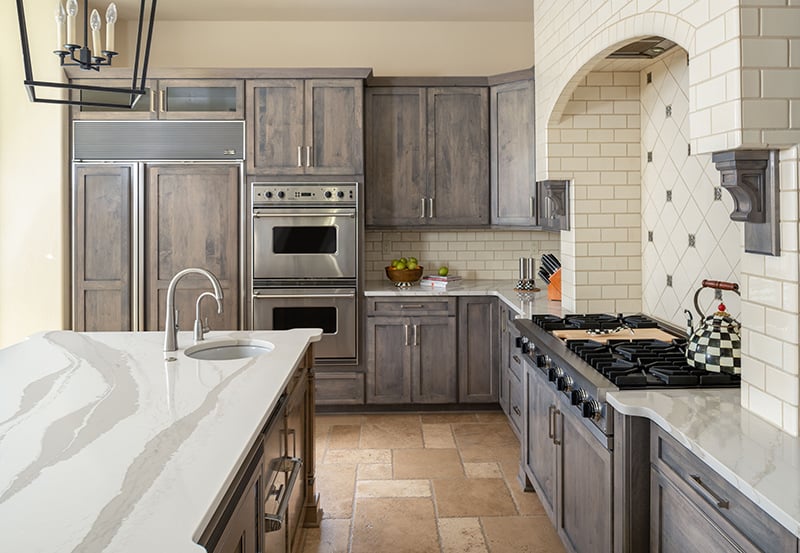
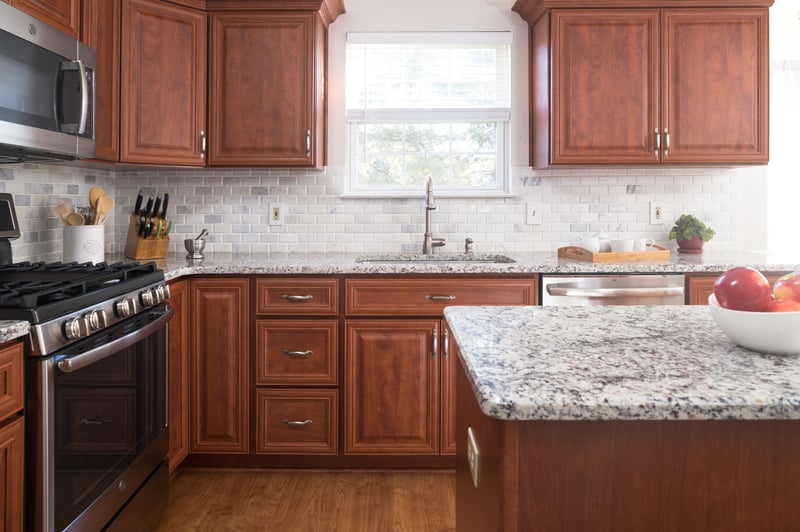
Raised Panel Cabinets
For centuries, raised panel cabinetry was considered the most luxurious cabinet door option because the extra ornamentation has a furniture-quality to it and craftsmanship typically comes at a premium. So, raised panel cabinet doors tend to be appreciated by those who love gorgeous woodwork and detailing.
Raised panel doors were incredibly popular during the 1960s and 70s, but then started to fade into the proverbial backdrop with the prioritization of quick builds over custom homes and simplicity above intricate décor.
Raised Panel Cabinet Door Features:
The panel of the door is elevated higher than the frame
Works well with woodgrains because they highlight the inherent beauty of the wood
Raised panels can have arched or curved details
The Pros
For those who love raised panel cabinet doors, the pros include their artistic look, warmth and the elaborate or luxurious look they offer a kitchen or living space. Raised panel doors are in the same category as coffered ceilings and gorgeous crown molding. You’ll love flexing your design muscles as you comb through all of the elegant options.
The Cons
If you want to use raised panel cabinets in your kitchen be mindful that the extra edges, ridges and details require slightly more effort to clean, polish, and maintain. It’s also important to balance embellished cabinets with simplicity so your cabinets don’t overwhelm your overall kitchen design. And, finally, raised-panel doors are usually more expensive than flat- or shaker-style cabinet doors.
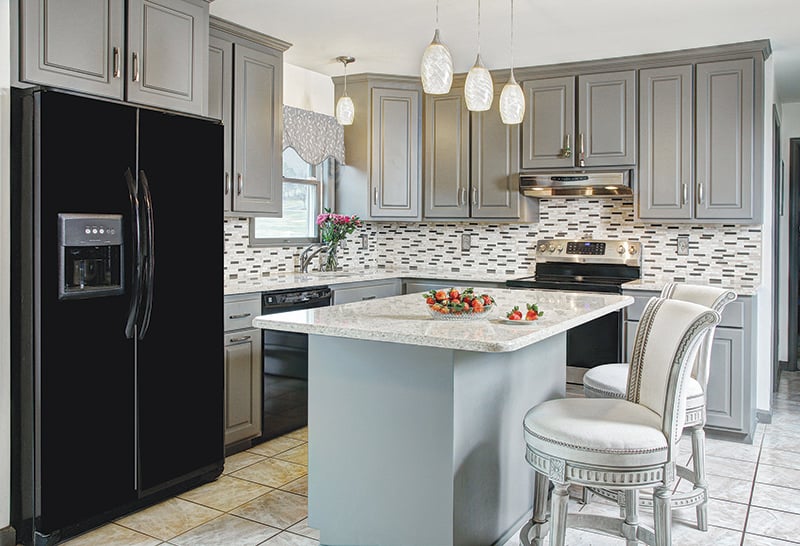
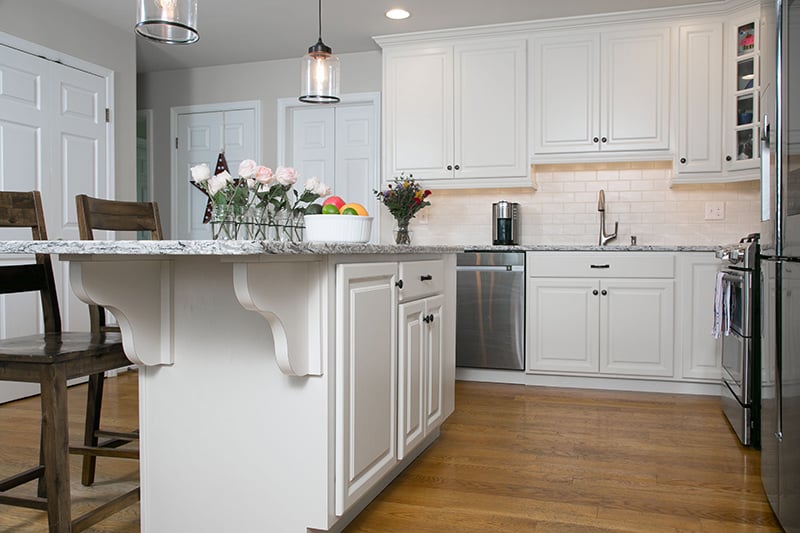
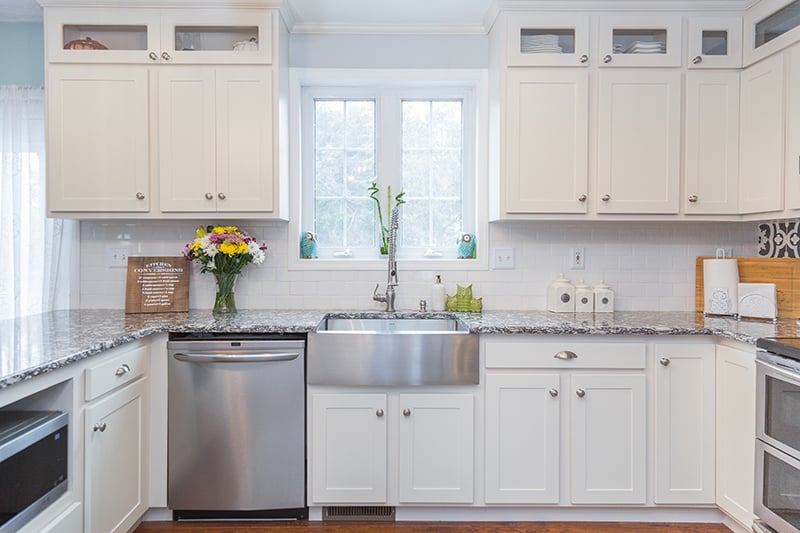
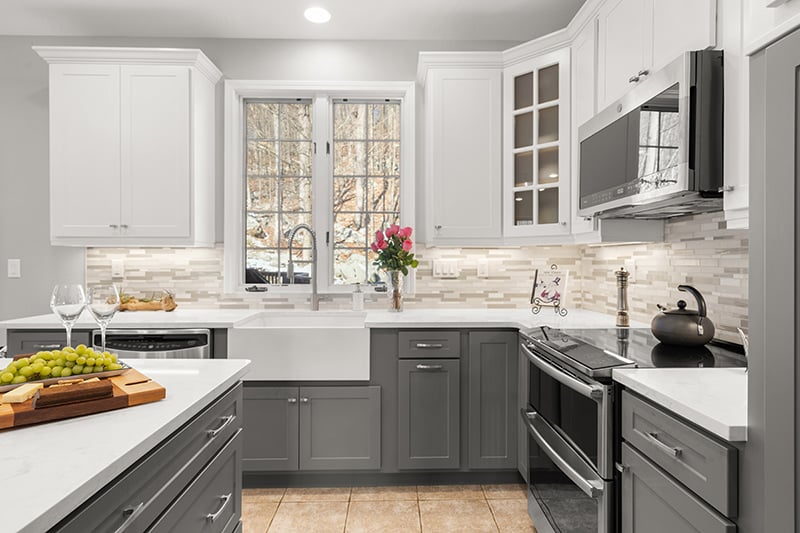
Flat Panel and Shaker Style Kitchen Cabinet Doors
Flat panel cabinets are currently a “hot item” in the kitchen design world due to the growing popularity of modern and farmhouse design trends. But that really explains it all; contemporary and farmhouse design trends are technically opposites. The former is very “now” while the latter is more Traditional, but flat panel cabinet doors complement both styles.
This is just a reminder that your personal style preference matters more than any trend. And it’s noteworthy to mention that cabinet hardware such as cup pulls can add their own layer of dimension to any kitchen design.
Flat Panel Cabinet Door Features:
Flat cabinet panels with no border or, as in the case of shaker-style options, the doors may have a simple raised border
Lack of ornamentation or intricate detail
Straight lines and right angles
They support a clean and streamlined aesthetic
The Pros
Fans of flat panel cabinet doors love the simple, streamlined look and the fact that they are easier to clean with less details to catch dust and grease. Also, this flat panel style cabinet doors tend to cost less than raised panel options.
The Cons
Some homeowners complain that finger and dog nose prints are easier to see on flat-panel doors, despite being easy to clean and maintain. Their simplicity can lead to an overall flat look and feel if you don’t add visual interest in other areas of the kitchen design. While stained options are available, flat panel cabinets tend to look their best in solid colors. So, if you prefer the look of woodgrain, a simple raised panel might be a better choice.
Consider your own personal style
Let Kitchen Magic help you tap into your personal design style. Our kitchen design consultants will always honor your personal preferences in every other aspect of your design.
If you’re ready to change how your kitchen looks and functions, our free design consultation is fun and informative! Just give us a call at 866-525-7999, or click here to schedule your free design consultation with Kitchen Magic right now!
Want more design inspiration? Download our 2022 Kitchen Lookbook – it’s completely free and full of our most popular kitchen remodels!


 Kitchen cabinet door styles can often be overgeneralized without providing homeowners with a full-picture understanding. This certainly seems to be the case with raised panel cabinets and their flat panel counterparts. In this article, we highlight these two common cabinet styles – explaining their differences, as well as the pros and cons of each – without emphasizing current trends.