Category: Beauty & Perosnal Care

  • What Does Sun Damaged Skin Look Like?

    What Does Sun Damaged Skin Look Like?

    [ad_1]

    Years of spending time outdoors in the sun will take a toll on our skin. The hours and days we’ve logged exposed to the elements can be seen in dark spots, wrinkles, sagging skin and discoloration. Unfortunately for sun lovers, sun damage can age our skin prematurely and increase our risk of developing skin cancer. Read on for the most common signs and symptoms of sun damage on the face and body, and to find out how to improve the appearance of your skin.

    Sun Damage On The Face: Signs & Symptoms To Look Out For

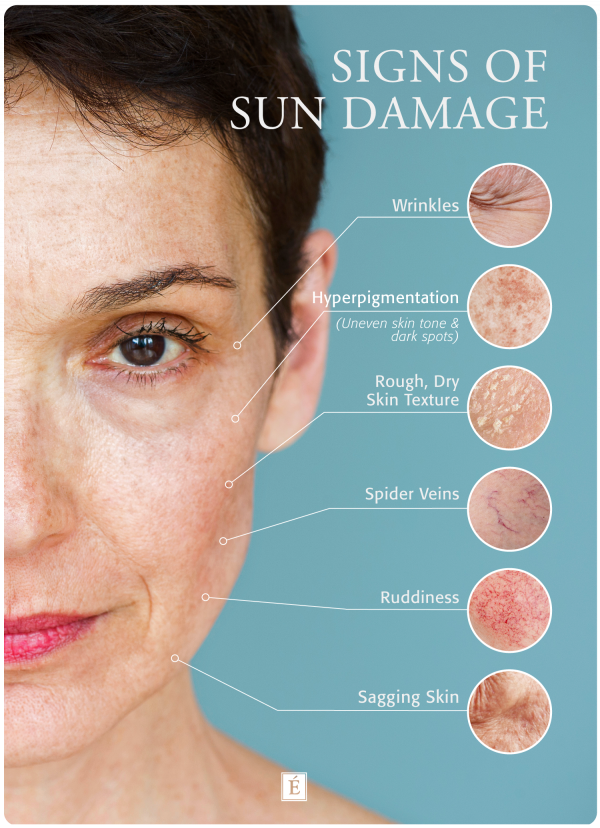
    Unlike typical chronological aging, which is determined by your age and genetics, sun damage occurs when UV light from the sun permanently changes the skin’s structure. These symptoms include:

    Rough, Dry Skin Texture

    After many years of UV exposure, you may develop textural changes in the skin. This can look like scaly patches and crusty skin that is thicker in density and raised from the surface. According to the American Academy of Dermatology Association, you may spot deep lines or dry, scaly patches called actinic keratoses (AKs), which are pre-cancerous skin growths. This type of sun damage can also lead to skin cancer, as AK sometimes turns into a type of skin cancer called squamous cell carcinoma. Keeping an eye on any changes in your skin and consulting a doctor will help you catch any potential skin cancers early.

    Wrinkles & Fine Lines

    Long-term changes in the skin’s collagen, which gives the skin its elasticity, can be a symptom of sun damage. These changes can include fine lines, wrinkles and a thickened skin texture. Unfortunately, lengthy exposure to UV rays prematurely ages your skin and results in the loss of collagen and skin elasticity. In fact, an astonishing 90% of visible aging is caused by exposure to the sun’s UV rays. 

    Sagging, Loose Skin

    Elastin and collagen are two proteins in the skin that deteriorate, not only due to the natural aging process, but also because of external factors over time. These factors include too much sun exposure, as well as lifestyle choices such as poor nutrition, excessive alcohol consumption and smoking. This breakdown of collagen and elastin production causes loose, sagging skin.

    Spider Veins 

    As collagen deteriorates, fragile collagen structure leads to decreased pressure around the blood vessels and reduced elasticity of the skin. This change means spider veins are more likely to appear at the skin’s surface as a network of red, purple, and blue lines reminiscent of a spider’s web.

    A Ruddy Complexion

    It’s possible for a ruddy complexion to be inherited. However, it can also be caused by excessive sun exposure. Ruddy skin is characterized by a reddish appearance and skin that looks uneven, blotchy or has broken capillaries.

    Hyperpigmentation 

    Uneven skin pigmentation (or hyperpigmentation) is a broad term that refers to an uneven skin tone or dark spots appearing. With uneven skin tone, you’ll notice parts of the skin have become discolored or darkened, caused by either sun damage or genetics. Skin pigmentation can be categorized as either a raised lesion (papule or plaque) or a flat lesion (patch or macule). 

    Another type of hyperpigmentation can be seen in moles. Any abnormal change in your skin is a good reason to consult a doctor to check for signs of skin cancer. A spot that was a light color when you first noticed it in your 30s can change appearance later on in life. Keep an eye on these dark spots, and visit your doctor if you notice changes in color, texture, size or shape.

    Dark spots, also known as sun spots, liver spots or lentigines, are yet another type of hyperpigmentation. They look like extra-large freckles or flat brown spots. These form from chronic exposure to UV light, and they typically appear on your arms, legs, face, hands, neck and décolletage. This is different from skin pigmentation issues which occur when cells become damaged, reducing melanin production. 

    If you’ve noticed any of these skin issues, read on to find out how to protect your skin from further sun damage and improve the health of your skin.

    How To Protect Your Skin From Sun Damage

    If you want to keep your skin looking radiant and healthy long term, below are six the steps you can take to protect your skin. And watch the In The Mix video below for a quick refresher on how to apply it properly. 


    1. Apply SPF Every 2 Hours

    SPF is a preventative tool but only if you wear it and remember to reapply it. Reapply an SPF of 30 or above evenly every two hours — or more frequently if you are sweating, toweling off or coming into contact with water. 

    2. Limit Time Outdoors & Wear Protective Clothing

    Restrict your time outdoors when the sun is at its peak (generally from about 10am to 4pm in most parts of the US). The Skin Cancer Foundation says you should cover up with clothing, hats and sunscreen. You should also seek shade, especially when the sun is strongest.

    3. Choose A Sunscreen With SPF 30 Or Higher

    If you recognize any of these symptoms of sun damaged skin, the first step you can take is putting the brakes on any further damage. One of the most effective preventative formulas is sunscreen. By introducing SPF into your daily skin care routine, you’re warding off the early signs of aging and other sun damage with minimal effort, so use a sunscreen with a broad-spectrum SPF (sun protection factor) value of 30 and above regularly. Read this guide to learn about the benefits of sunscreen and why you need to wear it every day.

    4. Look For “Broad-Spectrum” On The Label

    While SPF measures how well the formula protects you from UVB rays, it won’t tell you anything about protection from UVA light. That’s why the second factor to look for in a sunscreen is a label stating “broad-spectrum.” This label means you’re getting protection from both UVA and UVB rays. UVA rays are what you can blame for the signs of wrinkles and fine lines. In comparison, UVB rays are responsible for causing sunburn and skin cancer.

    5. Choose an SPF With Moisturizing Ingredients

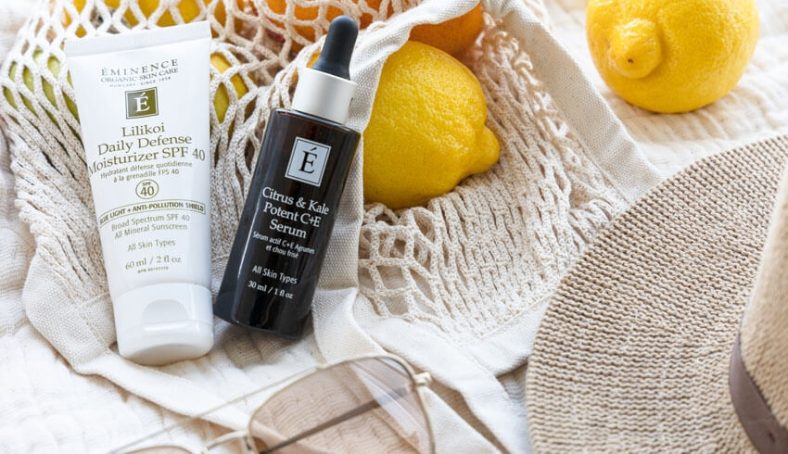
    If you have dry skin due to sun exposure, particular ingredients will help bring the moisture back. Our Lilikoi Daily Defense Moisturizer SPF 40 is formulated with zinc oxide plus lilikoi, cocoa seed oil and larch tree, a great moisturizing and nourishing combination of ingredients.

    6. Regularly Check Your Body 

    Whenever you exit the bath or shower, check your body from head to toe to become familiar with your skin and recognize whether any new spots appear. Keep a close eye on existing spots too, noting whether their appearance alters in any way. A reminder that a change in size, shape, color or border is a red (or pink or brown) flag that should be checked out by your doctor. 

    Are you dealing with signs of sun damage? View our range of sun care products to shield yourself from harmful UV rays or visit your nearest Eminence Spa for help identifying and reversing skin damage.

    [ad_2]

    Source link

  • Summer Skin Care: How To Prep Your Skin For Summer

    Summer Skin Care: How To Prep Your Skin For Summer

    [ad_1]

    We wait all year for the warm summer months. Long nights by the campfire, days at the beach, weekend getaways, hiking, biking and barbecues. And making the most of this special time of year usually means spending lots of time outdoors. 

    At Eminence Organics, we want you to enjoy being outside and stay protected with a proper summer skin care routine. We asked our esthetics experts to hand-pick a few favorite summer skin care essentials to help you prep and protect your skin as we move into the summer months. 

    Summer Skin Care For The Daytime

    Exfoliate To Prevent Ingrown Hairs

    For many of us, one of the major bumps in the road to getting summer ready involves hair removal – and specifically ingrown hairs. These little spots can develop after shaving or waxing when the hair grows back into the skin instead of straight out. They usually show up as tiny bumps that can be painful and even end up swollen and infected.

    Because cell turnover is much slower on your legs and underarms, dead skin cells can build up quickly, hiding stubborn ingrown hairs, clogging your razor and causing uncomfortable razor burn. Exfoliating your skin allows any hair that may be tucked under dead skin to be lifted and more easily removed. A scrub can help release ingrown hairs that are starting to form and prevent future ingrown hairs from developing. A couple of days before shaving or waxing, try the Coconut Sugar Scrub to slough off dead skin cells or use a swipe of the lactic acid-packed Bright Skin Licorice Root Exfoliating Peel to create a smooth and primed canvas.

    Protect Skin With A Sunscreen Designed For Exercise

    A sun-kissed glow might be a summer beauty goal, but proper sun protection is a non-negotiable part of any summer skin care routine. According to the Skin Cancer Foundation, more people are diagnosed with skin cancer each year in the U.S. than all other cancers combined.

    And while we’re on the subject: Did you know that your risk of melanoma doubles if you have had more than five sunburns in your lifetime? If you’re planning to spend time in the sun, protecting your skin from sun damage should be priority number one.  

    Shield your skin from the sun’s harmful rays with Lilikoi Mineral Defense Sport Sunscreen SPF 30, which is formulated with zinc oxide. Whether you’re swimming or playing sports outside, this sweat and water-resistant sunscreen offers broad-spectrum protection from UV rays throughout those hot days. Resistant through water activities and perspiration for up to 40 minutes, this sport formulation should be a permanent fixture in your beach bag to prevent sun damage. Just remember to apply it at least 15 minutes before you head outside and re-apply every two hours. More is more when it comes to protecting your skin. 

    Use A Replenishing Mask To Hydrate Parched Skin

    Chlorine (and salt water, if you’re a beach bunny) can strip away oil from the skin, leaving your summer complexion parched and dry. Consider treating your skin with a replenishing mask to rehydrate your complexion. If you’re suffering from too much sun and dry skin, our Strawberry Rhubarb Masque uses shea butter to provide the deep moisture you need for a plump and refreshed appearance. 

    To help the look of drying environmental damage, try a boost of vitamins and a smoothie’s worth of citrus, leafy greens and avocado oil. Not only does the Citrus & Kale Potent C+E Masque improve the appearance of dry, red skin, it leaves you looking bright, firm and plumped.

    To rejuvenate your skin after masking, rehydrate your whole body with plenty of water. Down those eight glasses a day and keep your moisture levels topped up, inside and out.

    Switch To A Moisturizer With SPF

    Who doesn’t love the ease of a moisturizer that doubles as sun protection? Our Lilikoi Daily Defense Moisturizer SPF 40 is the multitasker you need this summer. This moisturizer uses natural minerals zinc oxide and titanium oxide to block UV rays. Lilikoi seed oil helps with the visible signs of aging, so the Lilikoi Mineral Defense Moisturizer not only protects the skin from the elements, it also leaves you lightly hydrated and looking fresh and natural. 

    And since we’re really into SPF around here, it can’t hurt to mention another all mineral SPF moisturizer that is silicone-free and formulated specifically for the face and neck. The Tropical Vanilla Day Cream SPF 40 has shea butter and a light scent of vanilla – you’ll feel as though you’ve been transported to a tropical oasis.

    Apply Makeup That Doubles As Sun Care

    If you’re looking for another multi-purpose product, our mineral powders pull double duty as skin care and makeup. For a more natural look this summer, swap out your traditional finishing powder for our Sun Defense Minerals. With five versatile shades plus one translucent powder to choose from, you’ll find just the right option for you. And don’t forget to protect your lips, which are highly susceptible to sunburn. Rosehip & Lemongrass Lip Balm SPF 15 is infused with rosehip oil, lavender and zinc oxide to keep your pucker perfectly moisturized and protected.

    At Night: Repair Your Skin For An Ongoing Glow

    Nighttime Skin Care Starts With Cleansing 

    You’re doing everything right during the day, but even the most protected skin can use some overnight care. Whether it’s chlorine, salt water or a bit too much time with a bit too little sunscreen, your skin will always benefit from some TLC. To help keep the skin clear this summer, make sure that you never go to bed without washing your face. Skipping the occasional wash might not seem like a big deal, but between sweat, oil, sand and SPF, your face sees a lot on a summer day and needs a good cleanse to get rid of all the surface buildup and impurities. Try the Mangosteen Daily Resurfacing Cleanser and head to bed with a fresh face.

    The sun’s harmful impact on the body doesn’t stop once you’ve sought out shade; the effects of UV exposure, including dry and itchy skin, can take from two to four hours to fully develop. Because of this, it’s always a good idea to follow time spent in the sun with the replenishing moisture from these Eminence Organics after-sun essentials.

    Replenish Moisture

    If your skin is suffering from sun exposure, hydrate and gently resurface dry skin with our Mangosteen Body Lotion. Infused with antioxidant-rich mangosteen and our Lactic Acid Complex, this lightweight lotion will leave your skin soft and moisturized.

    Give dry, dull, itchy skin across your body some relief with Yuzu Solid Body Oil. This transformative solid body oil infuses dry, dull skin with dreamy yuzu and vitamin-rich camu camu for radiant skin. Refining PHA and lush tropical oils enhance hydration for all skin types to leave even the most sun-parched skin supple and glowing. Plus this body oil has a light yet irresistible citrus scent that feels as bright and uplifting as the summer sun.

    How do you protect your skin from the sun? Browse our full list of summer essentials and find even more summer skin care tips and recommendations at an Eminence Organics Spa Partner near you.

    [ad_2]

    Source link

  • Lymphatic Massage For Face And Body

    Lymphatic Massage For Face And Body

    [ad_1]

    While you may not be familiar with lymphatic massage, you have probably read about one of the most popular ways it’s done: with a gua sha tool. This, and other forms of lymphatic drainage massage, are getting a lot of play these days — and for good reason! These specialized drainage massages focus on the lymphatic system, a part of the immune system responsible for removing waste and toxins from tissues in the body. Since it serves an important role in overall health, it’s important to keep it moving. A targeted drainage massage can help keep the lymphatic system operating as it should. Let’s do a deep dive and then explore different lymphatic massages you can do at home to get your own lymphatic system flowing.

    What Is The Lymphatic System? 

    The lymphatic system is a network of vessels, nodes and ducts that pass through almost all bodily tissues. Its main function is to speed up the process of removing certain toxins and waste from the body. It does this by draining excess fluid that builds up in tissue, filtering out foreign bodies and transporting the fluid back into the bloodstream. As fluid moves through lymphatic vessels, it passes through lymph nodes that contain high concentrations of lymphocytes (types of white blood cells), which attack pathogens like bacteria, viruses and fungi.

    The system allows the circulation of a fluid called lymph through the body in a similar way to blood. It plays a key role in fighting disease and in overall health. An excess in fluid buildup can lead to issues that can make us feel uncomfortable, run down and even sick. The lymph system also helps absorb dietary fat and fat-soluble vitamins. With so many functions, it’s clear that a functioning lymphatic system is important to our overall health! 

    Why Do We Need Lymphatic Massage?

    As mentioned, lymphatic fluid passes through the body like blood. However, unlike blood, which is circulated through the body with the help of a pump (the heart), the lymphatic system has no “pump.” It relies on pressure, muscle contractions, and one-way valves to squeeze fluid through a network of vessels. As mindbodygreen explains, “muscle contraction [plus] diet, exercise and physical manipulation are all required for the system to function normally.” That’s where lymphatic massage comes in.

    Since the body often needs a little help to get the system moving, massage is a gentle way to alleviate some of the uncomfortable buildup and even dangerous issues that are associated with a slow or malfunctioning lymphatic system. Stagnant lymph flow leads to waste and toxin buildup, weakening immunity and leading to a wide variety of health issues including fluid retention, respiratory issues, sinus infections, swollen glands, eczema and colds. 

    To find out more, follow along as we explore simple techniques known to help stimulate the lymph system, which can be performed at home with a few simple tools. 

    Do I Need Lymphatic Drainage?

    Because a slow lymph system can cause fluid retention, a telltale sign that there is an issue is puffiness in the face. Whether it’s fuller cheeks or undereye bags, the extra fluid can affect the way you look and feel. Giving yourself a gentle massage at home is a relaxing way to address the symptoms and may provide benefits beyond just reducing swelling in the face. “A stagnant lymphatic system can cause acne, breakouts, even full dry skin,” celebrity facialist Joanna Vargas says. “As the lymphatic system accumulates more and more waste, it can result in inflammation (and all acne stems from inflammation of some kind). So by flushing out that waste and encouraging flow, you can keep the skin from becoming congested.” With these potential benefits in mind, let’s get started:

    Massage For Facial Lymphatic Drainage

    Step 1

    Apply 3-4 drops of facial oil to add slip to the area. This will prevent the fingers from tugging. Two oils that work well for this type of massage are the Facial Recovery Oil and the Camellia Glow Solid Face Oil.  If you choose to use a gua sha tool for lymphatic drainage, follow the instructions here or here.


    Product Picks

    Award Winning

    Luxurious facial oil – All skin…

    Award Winning

    With luxurious botanical oils


    Step 2

    Begin by placing two fingers (pointer and middle) about an inch out from the center of your neck and apply gentle pressure. Lift the chin to help with the draining. Draw 5-10 tiny circles in the area with fingers moving forward. Next, move the fingers up towards the top of the jaw where it meets the ear and repeat 5-10 tiny circles or downward strokes in that little nook. Then move the two fingers on each side down to the top of the collarbones and repeat small circles. These are the areas where the lymph fluid flows, so stimulating them will help the drainage. 

    Step 3

    Bring your two fingers to the top of the cheeks and repeat 5-10 circles. Move up to the cheekbones (under the eyes) and repeat 5-10 circles. Next, go just underneath the eyebrows, 5-10 circles. Finally, place three fingers (pointer, middle and ring) vertically on each side of the middle of the forehead and gently complete small circles every inch across the forehead until you reach your temples. 

    Step 4

    The most important last step is to swipe your fingers down towards your neck and collarbones 5-10 times to get the fluid to flow down to where it can be drained, as lymph fluid empties into the bloodstream via the subclavian veins at the base of the neck.

    When you’re done, leave the oil on for maximum benefits and drink plenty of fluids! Well-hydrated tissue helps move out waste. 

    Watch as our Lead Skin Care Trainer, Natalie Pergar, walks you through this routine. 


    Body Massage For Lymphatic Drainage With Dry Brush

    Much like the face, the body can show signs of a sluggish lymphatic system through water retention, puffiness and even worsened cellulite. Different types of massages can help get the system going. One of the main techniques uses light rhythmic movements to stimulate the lymphatic system without pressing on any vessels. This movement allows lymph fluid to flow through nodes and tissues beneath the skin surface. It prevents fluid retention by gently stretching the skin in the direction of lymph flow.

    While this type of massage is best left to a professional, dry brushing is a simple, quick and effective way to perform a type of lymphatic massage at home.

    What Is Dry Brushing? 

    Dry brushing is another body care technique that gets the lymphatic system flowing. Derived from Ayurvedic medicine, this technique has been around for centuries. It is a natural detoxification practice that gently flushes out toxins without disturbing the body’s balance and can help you feel energetic and revitalized. Most dry brushes are made of a wood base with natural fiber bristles. They can have long handles or just a strap that wraps over the hand for easy gripping. The bristles are generally quite firm but because you’ll only be applying gentle pressure, they shouldn’t feel rough against your skin. However, they will perform a gentle skin exfoliation, which is a nice bonus. 

    For best lymphatic drainage results, dry brushing should be done on bare skin. Also, consider dry brushing in the shower (without any water running) to effortlessly eliminate sloughed-off dead skin down the drain.

    Step 1

    As the name suggests, dry brushing is done dry – meaning a dry brush (without any oil or lotion) placed directly on clean, dry skin. 

    Open up the neck area first. It helps to stimulate the sympathetic area of your lymphatic system – moving the fluids that run naturally through your body. When dry brushing, use wide, circular, clockwise motions. Always move towards the heart. Strokes at the neck will move down the body. Do 10 strokes on the right side and then repeat on the left. Remember, the goal is to gently stimulate the lymphatic pathways right under the skin. 

    Step 2

    There are lymph nodes in the armpits, so that is an area that shouldn’t be missed. Begin by brushing under the arm and down the back of it (from armpit to elbow), again moving across the chest towards the heart. Complete about 10 light strokes in each area. 

    Step 3

    Next up, your hands and lower your arms. Start at the ends of the fingers and lightly brush up the arm towards the heart. Repeat 10 times on each surface of the arm, including the inside of the wrist up to the elbow.

    Step 4

    Lightly brush the abdomen area. Draw circles both clockwise and counter-clockwise around the belly button and then brush from the lower stomach up towards the chest in light, vertical strokes. 

    Step 5 

    Now on to legs. If possible, place the leg you’re working on up on a bench or stool so that you can easily reach down without hunching over. Start with the top of the foot and gently brush 10 strokes up. Follow this with 10 strokes on the calf, both front and back, spending extra time right behind the knee, to stimulate those lymph nodes. Also brush around the knee cap where fluid can get stuck. Repeat on the other leg. And then do the same for the thigh area and the buttocks. 

    When you’re done, your skin will be smooth and exfoliated, but may feel slightly dry. The best way to end the dry brushing session is with a quick shower (bonus points if you can tolerate 30 seconds of cold water at the end, as the shock of cold causes your lymph vessels to contract, forcing your lymphatic system to pump lymph fluids throughout your body). After the shower, dry off and apply Stone Crop Contouring Body Cream to help hydrate the skin post dry brushing session. 

    Watch our Lead Skin Care Trainer, Natalie Pergar, demonstrate the dry brushing technique that you can do at home. 


    Now that you know the benefits of lymphatic drainage, try some of these techniques at home! 

    [ad_2]

    Source link

  • How To Get Rid Of Forehead Wrinkles

    How To Get Rid Of Forehead Wrinkles

    [ad_1]

    As you grow older, your face naturally begins creasing into your most common expressions. At Eminence Organic Skin Care, our goal is to live and age beautifully and naturally. Hopefully, laugh lines dominate and show off a lifetime of joy, but for many people, forehead wrinkles and their appearance of worry and stress develop as well. If you find your face naturally settling into an expression of permanent anxiety, you may want to consider ways to “fight the frown.” Here are five natural ways that can unknit those brows and help you age gracefully:

    How To Get Rid Of Forehead Wrinkles:
     1. Acupuncture

    You may be dodging botox but that doesn’t mean you need to avoid the all-natural needles used for acupuncture. According to Stylecaster, the prick of acupuncture needles tones the facial muscles, leading to fewer lines and wrinkles. Besides its positive effect on muscle tone, acupuncture also apparently stimulates the production of collagen and elastin, resulting in less prominent forehead wrinkles and more youthful-looking skin. Eminence Organics Hibiscus Instant Line Filler

    2. Eminence Organics Hibiscus Instant Line Filler

    In two minutes or less, the Eminence Organics Hibiscus Instant Line Filler smooths and plumps the look of fine lines and wrinkles. Formulated with botanical peptides and ice wine actives that increase elasticity and tighten the skin, this all-natural filler immediately minimizes the look of lines. With its innovative curved tip applicator, it can literally smooth away the look of wrinkles on your forehead.

    3. Surgical Tape

    That’s right, taping your face when you sleep could actually physically prevent the muscles in your face from tensing into an expression of stress. Strategically placed, surgical tape or facial patches can hamper your night-time face scrunching, smoothing out your skin into a flawless look that may last even during a tape-free daytime. Since lines are often due to the repetitive actions of your facial muscles, halting overnight frowning gives new meaning to the term “beauty sleep”!

    4. Exfoliation

    One way to bring on more youthful-looking skin is chemical exfoliation. Because acids penetrate deeper than physical granules, a chemical peel offers a more glowy and even complexion. The Firm Skin Acai Exfoliating Peel removes the dull surface layers of dead skin cells to reveal the new, younger skin beneath. This gentle peel also deeply hydrates and reduces the appearance of fine lines and wrinkles. 

    5. Serums And Overnight Masks

    Our Product Support Team recommends applying a serum and a mask to keep your skin looking firm and glowing. The Bamboo Firming Fluid contains a Natural Retinol Alternative so that look of elasticity in the skin is improved. The formula contains coconut water, bamboo and coconut oil that moisturize and restore the skin’s moisture barrier.

    You can also apply the Strawberry Rhubarb Hyaluronic Serum which helps your skin appear smooth and silky. A unique Botanical Hyaluronic Acid Complex preserves moisture in the skin with a blend of multi-weight hyaluronic acid and marshmallow root.

    As an overnight treatment option, consider the luxurious Bamboo Age Corrective Masque. Argan oil contains antioxidants to soften and moisturize the skin’s appearance, as well as shea butter that moisturizes because it is high in triglycerides and fatty acids.

    Share your thoughts and beauty tips with us in the comments below and join the conversation on social media.

    This article was originally written in May 2017. 

    [ad_2]

    Source link

  • How To Prep Your Skin For Summer Hair Removal

    How To Prep Your Skin For Summer Hair Removal

    [ad_1]

    Swimsuit season is coming, which means it’s a great time to consider how you want to deal with unwanted body hair. It’s also a perfect occasion to give your legs, underarms and bikini line the thought and attention they deserve. Whether your removal method is a DIY shaving session at home, a new gadget you saw on Instagram or a spa visit for waxing or laser hair removal, there are a few things to keep in mind that will make the experience run smoothly.

    How To Prep For Hair Removal

    When it comes to body hair in general, one of the most common issues that can make for a bumpy ride is ingrown hairs. These pesky little spots show up when a growing hair starts to curve or loop into the skin instead of straight out. Ingrown hairs can cause tiny, swollen bumps that look like blisters or acne – pus and all. They can also form cysts (sacs of fluid beneath the skin) and can range from small and painless to large, swollen and infected. Sometimes they will burn, itch or sting. All in all, an unpleasant scenario – especially in some of the more sensitive areas of your body. This can happen at any point in the hair growth cycle. However, shaving, tweezing and waxing are known to trigger this response, so doing a little “leg work” before hitting the blade or your waxing appointment can pay off big time.

    How To Prevent Ingrown Hairs

    Cell turnover is much slower on your legs and underarms, meaning dead skin cells can build up quickly, hiding stubborn ingrown hairs or clogging your razor and causing uncomfortable razor burn. So the goal when trying to prevent ingrowns is to lift any hair that may be tucked under the dead skin so that it can be removed more easily. Gently exfoliating a day or two before your hair removal session – and every other day after – will help minimize the risk of a rogue hair curving back into the skin. A simple way to do this is with your favorite Eminence Organics body scrub to slough away the dead skin and reveal a razor or wax-ready surface.

    You can also try salicylic acid or glycolic acid a couple of days before a hair removal session. These exfoliators use acids (not as scary as they sound) to encourage faster cell turnover and, in doing so, get rid of any dead skin cells that might otherwise cling on longer than you’d like. A swipe of the Clear Skin Willow Bark Exfoliating Peel should do the trick. 

    With the dead skin gone, you’re ready to move on to your shaving or waxing. Let’s cut to the chase!

    Shaving Best Practices

    Shave In The Evening

    While it may be more convenient to shave during your morning shower, you’ll actually get a closer shave at night. According to Allure, “As you sleep, legs swell slightly, which can hide a portion of the hairs.” For a closer shave, wait until evening to pull out your razor and tackle hairs that will go into hiding overnight. Expert tip: Shave towards the end of your shower when your hair follicles have warmed up and are the softest.

    Ditch Your Shaving Foam For An oil

    Swapping your shaving foam for an oil provides a barrier between your skin and the blade, resulting in a closer, smoother shave. Using an ultra-hydrating oil like the Apricot Body Oil replenishes your skin’s moisture (thanks to jojoba and grapeseed oils) and improves your shave, leaving your limbs soft and silky.

    And even with the most thorough prep, sometimes skin can get a little irritated. A few sprays of Soothing Chamomile Tonique post wax or shave can help. With ingredients like aloe vera, lavender and chamomile, it has a soothing, calming and hydrating effect on the skin.

    Some Other Important Shaving Tips

    • Make sure your razor is sharp: If it’s tugging more than gliding or looking less than fresh, toss it. It could be harboring bacteria, and a dull blade can cause nicks, cuts and razor burn if not something even worse, like infection.

    • Rinse your blade between strokes: Seems simple but sometimes you just want to speed through the shaving process. A razor covered in hair, dead skin cells and too much oil or foam isn’t doing you or your skin any favors.

    • Don’t try dry: We’ve all been in a rush or needed a quick touch up outside of the shower, but this is a recipe for disaster. Razor burn, nicks and irritation are among the very likely scenarios when you try to cut corners like this. Even a splash of water is better than nothing!

    Another At-Home Option 

    What is the crystal hair eraser? We can’t talk about hair removal without mentioning the tool that went viral on social media recently. The crystal hair eraser, also known as the magic hair eraser or hair removal stone, is a hair removal device that fits in your hand (think: computer mouse or bar of soap in size and shape). The top is smooth and the bottom is a “crystalline” surface – which is basically a less scary way of saying it’s made of etched glass. 

    Now for the how-to: The crystal hair eraser is pretty easy to use. Lightly rub it on dry skin in a circular motion, the hair will clump together and slough off. The result is similar to shaving, as you’re removing the hair at the follicle opening, not the root (like you do with waxing). 

    Like shaving, it’s easy to do at home and is a good last-minute fix when you want to throw on shorts or a swimsuit. Unlike shaving, it’s done on dry skin – meaning that it can be done anywhere and with no foam or oil. Just wet the crystalline surface with water and you’re good to go. 

    It can be used on most parts of the body, including legs, arms, bikini line and back or chest. One area to avoid is the armpits, as the skin in that area can bunch up, making it hard to get to the hairs. 

    Much like shaving, the prep is minimal. A body scrub to coax out any hairs that might otherwise get stuck under dead skin couldn’t hurt. But because crystal hair remover exfoliates the skin as you go, you can get away with zero prep. You’ll need to moisturize after though. Slather on some Mangosteen Body Lotion or Yuzu Solid Body Oil (and then your SPF) to help with the dryness. 

    So is it worth the hype? Yes and no. It’s an easy and convenient alternative to shaving, but it’s not without its downsides. First of all, because it is a super exfoliator (the dead skin gets sloughed off with the hair) it can be messy – dead skin flakes and discarded hair everywhere! And according to board-certified dermatologist Dr. Mona Gohara, some skepticism is warranted. She tells Allure that even the basic mechanism by which crystal hair erasers work is unclear, saying “I’ve read a lot of articles and ads about this and I’m still dubious on the mechanism of action. Most claim that an etched crystalline surface makes the hair clump and fall off. When etched glass hits the skin, I think ‘cutting’ instead of ‘clumping’ is the more accurate verb.” 

    Bottom line? It’s another option to try at home, but it’s not groundbreaking and probably won’t change your hair removal game too much. But because of the price point and potentially saving lots of disposable razors from the landfill, it can’t hurt to try it out!

    How To Prep For Waxing

    While waxing has many benefits (hello weeks of smooth skin with little maintenance), it’s not always the best option when spontaneous beach trips pop up. According to Healthline, for the most precise wax: “Hair has to be at least 1/4-inch long before you wax. This helps ensure that hair is completely removed from the root.” To get to that point, it’s best to let hair grow for at least two weeks before your appointment. And shaving between waxing appointments is not recommended. With proper planning, waxing can be a great option, but it’s not for everyone.  

    Keep Your Skin Hydrated

    Like with shaving, keeping your skin hydrated is essential for preventing uncomfortable ingrown hairs and other irritations. Cosmopolitan says, “your legs have almost no oil or sweat glands, which means zero natural moisture.” In the days leading up to your appointment, keep your skin moisturized with your favorite Eminence Organics body lotion. Try our Stone Crop Body Lotion, which includes hydrating stone crop, to soothe skin after waxing.

    Time It Right 

    Ease the pain of waxing by booking an early morning appointment when your body is under the least amount of stress. Whether you’re a seasoned waxer or first-timer, picking appointments at the time of the day when your skin and muscles are the most relaxed is ideal for minimizing pain and discomfort. And the days leading up to your period can be extra sensitive. Try to avoid booking then if possible.

    Don’t Feel The Burn 

    It’s not always practical in the summer, but try to avoid steam rooms, saunas, swimming pools and ocean swims for at least 24 hours after your treatment, as they can irritate the skin.

    How To Prep For Laser Hair Removal

    Laser hair removal is becoming more and more popular and for good reason. As well as getting rid of unwanted body hair forever (after a few treatments), you can (and should) shave in between appointments. And while this option makes beach season even more carefree, it’s actually better to zap those hairs in the winter. 

    Since laser hair removal targets the pigment of your hair follicle, it works best when your hair is darker than your skin tone. According to Mayo Clinic, “A tan increases the risk of side effects, such as skin lightening … Some doctors recommend staying out of the sun for up to six weeks before laser hair removal.” If you have a summer appointment, make sure you shield your skin with SPF protection like the Lilikoi Daily Defense Moisturizer SPF 40 before heading outdoors. 

    Don’t Pluck Or Wax

    For laser hair removal to work, the hair follicle has to be present. Hair removal methods that disturb the hair follicle and interfere with the laser’s target (like plucking and waxing) should be avoided. To maintain smooth skin between appointments, steer clear of tweezers and wax strips and opt for a method that preserves the hair shaft and follicle, like shaving.

    Shave The Night Before Your Appointment

    Unlike waxing, you want the targeted area to be clean-shaven before your appointment. This way, “the laser can penetrate into the root of the hair — not target or singe any hair on or outside the skin,” according to Good Housekeeping. After shaving, skip your moisturizer, as lotions, sunscreen and makeup can “react with the laser and cause discoloration,” so it’s best to leave your skin bare before your appointment. (Reader’s Digest).

    Skip The Exfoliation 

    Since ingrown hairs are not an issue with this type of treatment, there is no need to exfoliate beforehand. In fact, it is best to keep all chemical exfoliants and acids away from the area – especially important for facial hair, like the upper lip, so that the laser doesn’t do any damage.

    Are you ready for a smooth transition into summer? Visit an Eminence Organics Spa Partner for your next hair removal appointment and tell us how you keep your skin smooth in the comments below.

    [ad_2]

    Source link

  • Are Foaming Facial Cleansers Right For You?

    Are Foaming Facial Cleansers Right For You?

    [ad_1]

    We all know that cleansing is the most important first step in your skin care routine for a few reasons. Removing the oil, dirt and buildup from the day (makeup, sweat and sunscreen, we’re looking at you!) is both a good defense against breakouts and an essential part of keeping your skin healthy. Plus, a freshly cleansed face is the optimal canvas for the rest of your skin care products. Foaming cleansers are a great option for many, but what is it about these light and fluffy formulas that sets them apart from other cleansers? Read on to find out whether foam is the cleanser texture best suited to your skin. 

    What Are Foaming Facial Cleansers? | Benefits Of Foaming Cleansers | What Are The Different Types of Foaming Cleansers? | How To Use A Foaming Cleanser | Is Foaming Cleanser For Everyone? 

    What Are Foaming Facial Cleansers?

    Foaming facial cleansers start as a lightweight liquid that transforms into a foamy lather when dispensed from a pump. They remove excess oil as effectively as gel cleansers, with the added bonus of foaming particles (aka bubbles!) that can make them powerful at lifting oil, dirt and buildup out of the deeper parts of your pores. This allows for an intense cleanse – for those who like to see lather to really feel clean and revitalized. 

    What makes foaming cleansers different from other face washes is the lather they create. Both cream cleansers and gel cleansers are great for gently cleaning and moisturizing skin, but without the bubbles to really target the dirt and oil as deeply. Gel and cream cleansers are a great fit for dry and combination skin, while foaming cleansers generally work best for complexions that are on the oilier side.

    Learn more about some of the other types of cleansers here. And watch our Lead Skin Care Trainer, Natalie Pergar, explain how different formulas work for different skin types. Hint: Often the best choice comes down to personal preference. 


    Benefits Of Foaming Cleansers 

    As mentioned, a foaming face wash can provide a deep clean by lifting dirt and debris from pores and removing excess oil and sebum. If you love the lather, this is your ideal cleanser type. Gentle foaming cleansers are also great as the second step in a double cleanse because they eliminate any oil that the first step might deposit. Foaming cleansers are gentle as well. With a pH level that is close to the skin’s they can clean deeply without stripping the natural oils and moisture from the skin barrier.

    What Are the Different Types of Foaming Cleansers? 

    Acne-prone skin loves a foaming cleanser because of its ability to get rid of excess oil and sebum. The Acne Advanced Cleansing Foam provides lightweight acne-cleansing action, effectively preventing acne breakouts and clearing blocked pores. The combination of time-release encapsulated salicylic acid and a natural herb blend in this cleanser soothes and tones, leaving the skin feeling clean, cool and refreshed.  

    Another gentle foaming cleanser that treats while it lathers is the Kombucha Microbiome Foaming Cleanser. Great for all skin types, this powerhouse product gently removes impurities without over-stripping. Kombucha, ginger, white tea and jasmine work together with micellar technology to refresh and balance the microbiome of the skin without compromising the moisture barrier. The microbiome is the skin’s unique ecosystem of bacteria existing on and in your skin, and works as a protective layer to support your skin barrier. As the first physical point of contact with your immune system, it’s important to keep this layer as healthy as possible. One way to support a healthy, functioning biome is to select microbiome-friendly skin care that works in alignment with your skin. Remember, a healthy and functioning skin barrier can help the skin look firm and plump. The correct skin care products should help to balance out the effects of environmental stressors.

    As one happy customer, Brenda, says about the Kombucha Microbiome Foaming Cleanser, “I absolutely love the feeling of the foaming cleanser. Afterward, my skin feels refreshed and clean. I purchased a bottle and have been using it daily. My skin definitely feels more taut and supple with no dryness, even on my sensitive skin.” 

    How to Use a Foaming Cleanser

    Always follow the instructions on your product as they can vary, but these simple steps are a general guide: The pump dispenser is key to transforming the liquid in your cleanser into a lightweight foam that glides easily over the skin. Wet the face with lukewarm water, apply the foam to your skin and massage gently with fingertips in a circular motion covering the face and neck. Rinse thoroughly and pat dry with a soft towel. Your skin will be primed and ready to absorb the rest of your products! Follow with your usual routine.

    Is a Foaming Cleanser for Everyone? 

    Foaming cleansers are a great choice for oily or combination skin because those lightweight and fluffy suds really target the oil and dirt that the day can leave behind. They’re also a good option for removing SPF and sweat when your skin needs something a little stronger. While they can be used both morning and night, some might prefer to use a gentler cleanser in the morning when there is less oil and other buildup, saving the deep cleaning that comes from the bubbles for the evening wash. 

    Some foam cleansers aren’t recommended for dry skin, as the consistency could leave your face feeling tight and even more dry. This is usually because of an ingredient called Sodium Lauryl Sulphate (SLS), a foaming agent commonly found in foaming cleaners, as well as bubble baths, many shampoos (and even factory floor degreasers!)

    All Eminence cleansers are free of SLS, instead using natural alternative ingredients such as Coco Glucoside and Alpha Olefin Sulfonate – both derived from coconut oil. These ingredients work gently to create bubbles that trap debris and rinse it away without stripping or drying skin!

    What is your favorite type of cleanser and why? Do you switch out your cleanser based on the time of day, climate or the season? Let us know in the comments or join the conversation on social media.

    [ad_2]

    Source link

  • The Benefits of Scalp Massage

    The Benefits of Scalp Massage

    [ad_1]

    When it comes to skin care, there’s an area that is often overlooked – the scalp. And while the skin on your scalp might not be top of mind, a regular massage can do wonders for circulation, relaxation and overall scalp health. Whatever your goal, the simple art of head massage is gaining popularity because of its many benefits. Read on to find out the benefits of scalp massage and how you can incorporate this technique into your self care routine.

    How To Use A Gua Sha For Scalp MassageHow To Use A Scalp Massaging Brush On The Scalp 

    Scalp Massage: What Is It and What are the benefits?

    Have you ever noticed how relaxing it is to have a gentle head rub when you have your hair washed at the salon? There’s a reason for that: Stimulating the scalp has an effect on the parasympathetic nervous system. This is a part of the nervous system that goes into energy-saving mode when your body is quietly resting and digesting (as opposed to “fight or flight” mode). Massaging the scalp brings down the level of the stress hormone cortisol.

    Besides eliminating stress, there are more scalp massage benefits, which may explain why scalp massagers and the ancient Chinese scalp massage technique of gua sha are getting so much play on social media right now. Scalp massage causes the blood vessels nearest the surface, which map across the front and top of your head and temples, to open up. This amplifies blood flow and oxygenation in the soft, connective tissues right under the skin where your hair follicles are.

    Not only does it bring down your tension level, scientific studies show that regular scalp massage creates a healthy, nourishing environment for hair to grow thicker and more fully.  Massaging is believed to stretch out the cells of hair follicles, which causes them to produce more robust strands.

    Which Tools Are Good For Scalp Massage? 

    The Gua Sha tool

    Gua sha is a centuries-old massage technique that stimulates the lymphatic vessels under the skin and promotes blood circulation. “Gua” means “scrape” or “scratch” and “sha” is the word for the reddishness that results from the treatment. 

    Gua sha massage stones for the face tend to be carved out of semi-precious gemstones like jade, aventurine, rose quartz, tiger’s eye or black obsidian, and they are flat with some rounded edges that are used to “scrape” the skin. For the scalp, gua sha can be done with specially designed combs that generally curve to naturally fit your hand. Gua sha combs have fewer and thicker teeth than ordinary combs. Like the gua sha face massage stones, the scalp massagers are often carved out of jade, rose quartz or agate or out of smooth, lustrous woods like neem or sandalwood. The important factor in choosing a gua sha comb is that it feels good in your hand and against your scalp.

    To reap the most benefits from gua sha scalp massages, a daily treatment is ideal, but performing one a few times a week can be beneficial as well. Timing it before each hair wash is a great place to start, especially when using oil that needs to be washed out. Of the 361 classic acupuncture points on the body, which are what traditional Chinese medicine describes as access points to the body’s flow of  “qi” or “life force,” about 60 are located on the scalp. 

    The point you should pay the most attention to in your gua sha ritual is what is viewed as the most powerful acupoint on your scalp: It is roughly at the crown of your head where the imaginary straight line running between the tops of both ears intersects with the straight line running from the center of your forehead to the back of your head. 

    How To Use A Gua Sha For Scalp Massage 

    Step 1

    Start by running your usual hairbrush through your hair to untangle any knots.

    Step 2

    Beginning with your natural part closest to the center of your hair, apply a few drops of the Facial Recovery Oil or Rosehip Triple C+E Firming Oil to your scalp.

    Step 3

    Applying gentle pressure, slowly run your gua sha comb from the front and middle of where your hairline starts along this central part and through to the back of your head, continuing down your neck.

    Step 4

    Section off your hair about an inch to the right of the central part that you just combed through and apply a few drops of oil to the scalp. Push your gua sha comb gently and firmly from the starting point of this section, just right of center, all the way to the back of your head and down your neck.

    Step 5

    Now, section your hair one inch to the left of your central part, apply a few drops of oil and repeat the process.

    Step 6

    On the right side of your head, section off your hair about an inch above your ear, apply a few drops of oil, and follow the same procedure from the hairline to the back of your head and neck.

    Step 7

    Finally, do the same on the left side of your head, an inch above your ear, arcing your gua sha comb widely around the ear to the nape of your neck.

    The Scalp massaging Brush

    Another popular scalp massage tool is the scalp massaging brush. Available in different shapes and sizes, it is generally round with silicone bristles (that look like little spikes) and an ergonomic handle to make it easy to grip and move around.

    How To Use A Scalp Massaging Brush On The Scalp

    Step 1

    Start with dry hair, using the scalp massager to gently comb it out (if you brush out your hair hanging your head upside down, that boosts blood flow even more).

    Step 2

    Sit up, put a towel around your shoulders, and apply a few drops of Facial Recovery Oil or Rosehip Triple C+E Firming Oil to your scalp.

    Step 3

    Work the oil all over your scalp with your scalp massager, using circular movements and medium pressure.

    Step 4

    Now, shower time! Wet your hair, apply shampoo and gently scrub your scalp with the massager using circular movements. A wet scalp massage is particularly effective at removing dead skin cells, but be careful not to overdo it: Three times a week is more than enough. 

    Eminence Organic Skin Care Products For Scalp Massage

    Facial Recovery Oil: Enhance your gua sha scalp massage with the fragrant blend of clary sage oil and ylang ylang, which can help you feel calm and relaxed.

    Rosehip Triple C+E Firming Oil: If your scalp tends to be dry, the sea buckthorn oil and rosemary leaf extract hydrate while jojoba oil helps restore your skin’s natural moisture.

    Both products can be left on for 30 minutes (or overnight) and should be shampooed out after application and before styling hair. Scalp massage can be performed up to three times a week, however we recommend only using Facial Recovery Oil or Rosehip Triple C+E Firming Oil on the scalp one to two times per week.

    In addition to your home care routine, why not incorporate a scalp massage into your next spa treatment? Visit our Spa Locator and find out more from an Eminence Organics Spa Partner near you.

    [ad_2]

    Source link

  • Body Wrap Treatment For Cellulite

    Body Wrap Treatment For Cellulite

    [ad_1]

    With summer around the corner, many of your Clients are thinking ahead to beach season. Some have probably already booked professional treatments to help them look and feel their best as the weather gets warmer. Cellulite is a common concern as shorts and swimsuits enter the chat. Read on to learn about treatments and skin care products that can help to reduce the look of cellulite as we transition into warmer months.  

    What Is Cellulite? What Causes Cellulite? | How Is Cellulite Treated? 

    What Is Cellulite?

    Cellulite is the name for collections of fat that push against the connective tissue just beneath the surface of your skin. It forms when fibrous bands that connect your skin to the underlying muscle tighten irregularly. This tightening pulls down on the skin, and the normal layer of fat beneath the skin pushes upward. The result is a puckering, lumpy or dimpled look to the texture of the skin, appearing most often on hips, thighs, stomach and buttocks. 

    What Causes Cellulite?

    It’s not entirely clear what causes cellulite but it is very common, especially among women. According to the Cleveland Clinic, between 80 and 90% of women who have gone through puberty have cellulite, while it only appears in about 10% of men. The reason for this disparity is unknown, but some experts believe that hormones are primarily to blame. Estrogen, the female hormone, tends to exacerbate cellulite because it encourages the body to build up and store fat while the male hormone, testosterone, burns fat. However, cellulite is more than just excess fat. It actually involves several components of the skin’s structure.

    When estrogen levels fluctuate, blood circulation to the connective tissues is reduced and the tissues are weakened. These hormonal changes also affect lymphatic circulation. This can leave stagnant lymph fluid trapped in weakened connective tissue and may increase the appearance of cellulite.

    Genetics, sex, age, the amount of fat on your body and your skin’s thickness determine how much cellulite you have and how visible it is. As you age, your skin loses elasticity which can make the appearance of cellulite more evident. Gaining weight can also make the appearance of cellulite more prominent. Although people with higher body fat percentages tend to have pronounced cellulite, it’s not uncommon for very lean people to experience cellulite as well. 

    Lifestyle changes that have been shown to help reduce the look of cellulite include eating a healthy diet that incorporates fresh, whole and unprocessed foods, drinking plenty of water and exercising regularly.

    How Is Cellulite Treated? 

    While it is not dangerous or painful, many people are self-conscious about the cellulite on their bodies. There is no cure for cellulite and it can’t be removed, however there are lifestyle changes, medical procedures and spa treatments like body wraps that can help reduce or improve the appearance of it. 

    Body wraps are spa treatments that involve applying a mixture of ingredients to the skin from the chest downward. The Client’s body is then covered with a wrap, usually made of plastic or cloth. The wrap is secured in place while the Client is left to relax for anywhere from 20 minutes to an hour. Body wrap treatments work by trapping heat, allowing the ingredients to penetrate deeply into the skin. Body wraps can target many skin care concerns, including cellulite, because these treatments stimulate blood flow, which can help improve circulation and give the skin a smoother, firmer and tightened appearance. 

    In this article, we will focus on a body wrap designed to target the look of cellulite and provide a protocol that you can use in your spa.

    Herbal Cellulite Treatment 

    For Clients hoping to improve the look of cellulite on the thighs, buttocks, lower abdomen and arms, a body wrap using the Herbal Cellulite Treatment is the gold standard. The skin will appear firmer and more elastic with paprika and skin-safe stinging nettle, which help energize and invigorate the look of the skin. The formulation also contains bioflavonoids and honey which enrich the skin with moisture. The Biocomplex2™ formulation works to bring back a look of vitality and youthfulness.

    Step 1

    Apply a thin layer of Herbal Cellulite Treatment mixed with equal parts water to cellulite-affected areas (such as legs, thighs, buttocks, stomach and arms.)

    Step 2

    Tightly wrap each area with plastic wrap, working from the lower body, upwards. Always wrap towards the heart. 

    Step 3 

    Leave the body wrap treatment on for 20 minutes or more, keeping the Client warm. (Before wrapping the Client, a short galvanic treatment on the body is recommended.)   

    NOTE: The Client may feel a hot, tingling sensation that could last up to 20 minutes, with a rosy color remaining for up to two hours. Advise Clients that this is a normal experience. 

    Do not do any exfoliation before this treatment, especially if this is the first body wrap application for the Client. 

    After the wrap has had time to work its magic, proceed with either a dry or wet removal. 

    Click here for the full body wrap treatment protocol.

    Another way to target cellulite? Caffeine. According to Healthline, caffeine has been found to dilate blood vessels which can temporarily tighten and tone tissues. The stimulant also boosts circulation and reduces water retention which can help smooth out bumpy cellulite on the body. If you’re looking to reduce the appearance of cellulite with a boost of caffeine, the luxurious Stone Crop Contouring Body Cream is a must. The active ingredients of coffee extract and microalgae extract deliver a slimming and smoothing appearance. Use as an all-over moisturizer or as a targeted treatment.

    Have you tried our cellulite treatments on your Clients? Share your experiences with us in the comments below. And find out how to become an Eminence Organics Spa Partner here.

    [ad_2]

    Source link

  • Summer Dream Team: Why You Need To Pair Vitamin C With SPF

    Summer Dream Team: Why You Need To Pair Vitamin C With SPF

    [ad_1]

    When you think of the perfect summer, you may imagine an escape to a tropical paradise; sitting on a white sand beach with a refreshing cocktail (or mocktail) in hand, watching the waves roll in while the warm sun beams down. And your skin? Perfectly smooth, even and glowing, of course. 

    While you may not have a trip to paradise planned, we can still help you achieve the skin of your dreams this summer – and it’s easier than you think!

    When it comes to summertime radiance, you only need to reach for two products to get glowing: a potent source of Vitamin C and a sunscreen. Read on to learn how to make the most of your daily summer ritual with these two essentials. 

    Why You Need Vitamin C

    You likely already know that Vitamin C is an essential part of your diet. But beyond your morning glass of OJ, this powerhouse ingredient can do a lot to enhance your complexion. So what exactly does Vitamin C do for your skin?

    When applied topically, Vitamin C can: 

    • Support your skin’s natural collagen production
    • Brighten your complexion by reducing the redness associated with environmental stress
    • Even skin tone by targeting dark spots
    • Neutralize free radicals, limiting skin damage
    • Prevent premature aging while visibly smoothing fine lines and wrinkles

    An added bonus? This potent nutrient is often found in bright, juicy and delicious summery botanicals like oranges, blueberries, blackberries, Kakadu plum, camu camu, kiwi and pineapple.  

    Why You Need SPF

    You probably apply sunscreen when the sun is shining its brightest. But you may not know that it’s important to use sun protection each and every day, especially when you’re spending lots of time outside. With all the summer fun of lounging by pools, backyard barbeques and frolicking on the beach, you’ll need to layer on your favorite sunscreen before heading outdoors – and be sure to reapply at least every two hours.  

    To get the most out of your sun care, ensure you’re applying SPF from head to toe, taking extra care to target your décolleté, hands, ears and feet. You can also pick up sun care products for your lips and scalp. And remember, when it comes to sun care, an SPF of 30 or more is ideal. 

    Better Together: the Potent Power of Vitamin C With Sunscreen

    Some things are better together. Case in point: Vitamin C and SPF!

    For all its beneficial qualities, Vitamin C does have one drawback: It’s prone to oxidation, which diminishes its effectiveness. If you’ve used a Vitamin C serum before, you may have noticed that it comes in an opaque bottle or dark amber glass. This type of packaging blocks light from getting in, stopping oxidation before it starts. Not only could Vitamin C oxidize in the bottle, it may also oxidize on the skin. According to Lab Muffin, “Some vitamin C serums that contain ascorbic acid, [can cause] slightly darkened skin after a few days of use. The stained skin looks red or orange-brown, sort of like fake tan.” This tends to be the case when the Vitamin C is not paired with sun protection. But fear not! Layering SPF over Vitamin C helps prevent oxidation.

    On her YouTube channel, London-based Cosmetic Dermatologist Dr. Sam Bunting explains these benefits. “No one gets 100% protection from UV from sunscreen,” she says. “ It’s almost impossible because we tend to underapply [sunscreen], it comes off through the day, maybe we’re not rigorous about topping up. We’re reliant on a second line of attack from an antioxidant serum, like a Vitamin C serum.” 

    Another perk to this combo? Vitamin C can actually boost sunscreen’s protective power. Chicago-based board-certified dermatologist Dr. Steven Mandrea, explains in an interview with Real Simple that  “combining Vitamin C serum and broad-spectrum sunscreens that protect well against UVA rays has been shown to be more effective at neutralizing free radical damage from sun exposure than just using sunscreen alone.” 

    A Summer Routine With Vitamin C + Sun Protection

    Ready to get glowing? This vitamin-rich routine brings on a bright, luminous look for all skin types. 

    Step 1 

    Mangosteen Daily Resurfacing Cleanser: This cleanser is perfect for smoothing texture without overstripping skin’s natural oils. A milky gel with a juicy scent, you’ll love this cleanser as a new addition to your skin care practice.

    Step 2

    Pineapple Refining Tonique: Tropical and vibrant, this toner smells like fresh pineapple juice! This daily formula combines gentle bromelain and PHA to exfoliate all skin types, including sensitive. Chemical exfoliation may sound daunting, but PHA and bromelain are gentle enough to get the job done without irritation.

    Step 3

    Citrus & Kale Potent C+E Serum: Bring on the brightness with this award-winning serum.

    Made with stabilized Vitamin C, Vitamin E, avocado, leafy greens and citrus oils, this serum is well-loved for its ability to reveal skin that looks youthful, plump and bright. 

    Step 4

    Arctic Berry Peptide Radiance Cream + Superfood Booster-Powder: Conquer dullness and dehydration with two illuminating formulas. First, reach for the Arctic Berry Peptide Radiance Cream. This hydrator firms and brightens the skin’s appearance with antioxidant-rich berries and our Peptide Illuminating Complex. Take it to the next level by adding a scoop of the Superfood Booster-Powder. This fine powder blends seamlessly into the moisturizer and indulges skin with Vitamins C, B3 and K from Kakadu plum, coix seed and spirulina.

    Step 5

    Hibiscus Ultra Lift Eye Cream: A bright summer routine wouldn’t be complete without a revitalizing eye cream. Made with hibiscus, ice wine actives and caffeine, the Hibiscus Ultra Lift Eye Cream de-puffs, lifts, brightens and tightens. All that in one quick and easy step! Plus, the cooling applicator feels super refreshing on the skin, especially on a hot day.

    Step 6 

    Lilikoi Daily Defense Moisturizer SPF 40: Protect skin with this broad-spectrum UVA and UVB SPF, enhanced with Vitamin C-rich lilikoi (aka passionfruit). The Lilikoi Daily Defense Moisturizer SPF 40 uses zinc oxide to provide sun protection. This formula also contains cocoa seed extract and satsuma mandarin peel, which helps improve the look of skin exposed to environmental stressors like blue light and pollution. Perfect year-round, especially for those sunny beach days!

    Tailor by Skin Type

    This routine is a phenomenal way to introduce vitamin-rich skin care into your routine. Plus, it ensures you’re protected from the summer sun. But if you have specific skin concerns, you can make these smart switches to cater to your unique skin type and concerns. 

    Dry Skin 

    While the Pineapple Refining Tonique works for all skin types, dry skin may like the Bright Skin Licorice Root Exfoliating Peel instead. This peel is designed to be used just one to three times per week rather than daily. Less frequent exfoliation helps dry skin retain moisture.

    Dry skin will also love the Rosehip Triple C+E Firming Oil. Vitamins C and E work hand in hand with rosehip, jojoba and seabuckthorn oil to give dry skin much-needed hydration. Apply before your SPF.

    Oily Skin

    Dealing with excess oil, large pores and breakouts? Grab the Mangosteen Gel Moisturizer. This lightweight formula quenches oily skin without adding grease or shine. Plus, this formula contains illuminating antioxidants to bring out the appearance of a summery glow. 

    Enhance your routine with the Mangosteen Daily Resurfacing Concentrate. Large pores don’t stand a chance against this dreamy formula’s mix of lactic acid, ribose and mangosteen. 

    Normal Skin 

    Normal skin should be good to go with the routine mentioned above. But if you like to go the extra mile, these formulas will enhance your bright glow while keeping your skin in perfect balance. The Kombucha Microbiome Luminosity Serum helps balance your skin’s microbiome for a healthy-looking glow.

    The Citrus & Kale Potent C+E Masque also gives your skin some extra radiance. Its delightful gel-cream texture smooths on easily and illuminates the skin through a botanical blend of ripe citrus fruit oils, avocado and leafy greens. 

    Sensitive Skin 

    You may be wondering if it’s possible to go overboard with Vitamin C: in some cases, yes! You’ll want to tread carefully when using Vitamin C on sensitive skin. Start slowly and consider reaching for the Kombucha Microbiome Luminosity Serum in place of the Citrus & Kale Potent C+E Serum. This calming serum reveals glowing skin without irritation. 

    You can also add on the Rosehip Triple C+E Firming Oil to gently introduce Vitamin C while hydrating dryness associated with sensitivity. 

    Have you tried Vitamin C and your SPF together? If not, use our Spa Locator to find an Eminence Spa near you. An esthetician can help you pick out the right products so you’re ready to glow all season long.

    [ad_2]

    Source link

  • Pore Strips, Glue And Other Skin Trends To Avoid

    Pore Strips, Glue And Other Skin Trends To Avoid

    [ad_1]

    If you’re anything like us, your social media feed is showing you a lot of so-called “skin care hacks” that claim to help you achieve the best possible complexion. While these DIY tricks may look good on TikTok or Instagram, many of them should be avoided, especially the ones inspired by spa treatments usually performed by trained professionals. Read on to learn about some popular internet trends that should be avoided — and discover the alternative treatments that are much better for your skin!

    Avoid: Pore Strips 

    Pore strips (also known as blackhead strips) aren’t a new trend, and actually first hit the shelves in the 1970s. They’re back in the spotlight because people online love to share the satisfaction of peeling them off to reveal what looks like buildup, dirt and oil found in their pores. The strips’ staying power is understandable – who wouldn’t want to empty their pores with a simple, inexpensive product that provides such instant gratification?

    Unfortunately, pore strips aren’t all they’re cracked up to be. They work by forcefully pulling the oil from sebaceous filaments that line your pores and maintain your skin’s oil balance. Any redness you might notice after using one is not the squeaky clean skin you think it is. Instead, it’s irritated skin that has been painfully stripped of the oils that work to keep your skin barrier in good working order. 

    According to Very Well Health, the benefits of a pore strip are temporary and not as impressive as a pore strip’s residue might suggest. Oftentimes, our sebaceous filaments – which actually play a key role in your skin’s hydration and oil regulation – are mistaken for clogged pores. Pore strips target these important sebaceous filaments, along with whatever else they can grab. Plus, when using them for nose blackhead removal, pore strips can only pull out a small section and can’t reach larger, deeper blackheads. This means leaving a large portion behind in your skin. Without addressing the root of the problem, you’ve only partially emptied a tiny crevice that is now ready to collect new dirt and buildup. Yuck. 

    Instead, opt for a chemical or finely powdered physical exfoliant. We love the Strawberry Rhubarb Dermafoliant to clear clogged pores around the nose. This fine powder works by gently removing grime or gunk without stripping the skin of the oils that work to protect it, giving you a deep clean without any damage. 

    Avoid: Using Glue To Remove Blackheads

    One of the more surprising trends we’ve seen is using glue to create a pore-strip-style product for the face. Yes, you read that right – we’re talking about the white, thick glue you used in grade school. 

    According to Healthline, this trend mimics the effects of a traditional pore strip. However “glue is not intended for human skin, and may cause your pores to become even more clogged.” While we understand the appeal of a budget-friendly hack, we definitely couldn’t recommend this one in good conscience – especially considering the nasty chemicals that glue contains. Avoid greater skin issues down the line and keep the glue for your next craft project. 

    Instead, incorporate a peel into your weekly routine. This will help keep blackheads, whiteheads and surface level texture at bay. We love the Clear Skin Willow Bark Exfoliating Peel

    Avoid: Pore Vacuums 

    You might have seen a newer tool pop up in your skin care aisle or social media feed: the pore vacuum. Pore vacuums are handheld devices that suction onto the skin, promising to pull out any blackheads, gunk or buildup that’s settled in. But don’t believe the hype.

    While pore vacuums look similar to highly effective tools used by spa professionals, they are not the same. The professional tools require specialized training to treat the area without damaging the skin’s layers. According to Healthline, at-home pore vacuums can cause bruising, discoloration and scarring, especially when used by someone not trained in esthetics. Worse, if you’re prone to sensitive skin reactions or rosacea, a pore vacuum can result in broken blood vessels or capillaries. 

    Instead, we’d recommend gommage – an exfoliating technique where a physical exfoliant is layered over a gel textured mask or treatment and gently rolled away with damp fingers after a few minutes. Gommage uses physical and chemical exfoliation to softly slough away dead skin cells and remove other debris from the skin’s surface. This technique is safe to try at home with a soft touch and slow movements. Or, head to your esthetician to have a professional safely perform extractions along with a gommage treatment.

    Keen to try it? Our Lead Skin Care Trainer, Natalie Pergar, recommends a combination of our Stone Crop Masque and Stone Crop Oxygenating Fizzofoliant for a gentle yet invigorating treatment. 

    Avoid: Face Taping 

    A newer trend to hit the internet involves applying sticky tape-style products on the skin before bed to reduce movement and prevent wrinkles through the night. While this might make sense in theory, there are many reasons why this isn’t an effective strategy for smoothing the face. 

    According to the Cleveland Clinic, any short-term fixes will quickly disappear as the skin resumes its normal position when you wake up and start your day. And worse, pulling off the tape can remove a layer of skin, prompting irritation, allergic reactions to the tape itself or even blisters. 

    Instead, encourage lymphatic drainage and soften the look of wrinkles by using a gua sha tool as part of your routine. A regular gua sha practice gently works the muscles, increases glow and reduces puffiness. Discover our favorite gua sha techniques here

    Avoid: Harsh Scrubs 

    Aggressively buffing away at a surface to smooth it out makes sense when painting a wall or priming furniture, but would you use a product akin to sandpaper on your face? We didn’t think so. Harsh scrubbing with products that use nut shells or other ingredients with sharp edges will not give you the clear base you’re looking for. 

    Harsh scrubbing with thick, gritty pastes can lead to microtears and irritation, damaging your skin barrier and creating the perfect conditions for future breakouts. Vigorous physical exfoliation can also strip the skin, causing it to overproduce lost oil, leading to acne and other issues. Plus, if you have existing breakouts, scrubs can aggravate already inflamed skin, making breakouts worse

    Instead, gently exfoliating with a finely powdered product is the way to go. While smoothing skin with a powder scrub, use plenty of water to work the product around the face. A chemical exfoliant will do the same job without any rubbing at all. Remember, skin care is a marathon, not a sprint. Make your exfoliating ritual slow and relaxing. Your skin will love you for it. 

    Avoid: Derma Rolling

    A derma roller is a handheld roller covered with tiny needles that you roll over the surface of your skin. Derma rolling takes inspiration from microneedling, a professional treatment that creates a low level of trauma to stimulate the production of collagen and elastin in the skin. Microneedling can be an effective treatment for firming the skin because a professional can make adjustments depending on how their Clients’ skin reacts. However, the “one size fits all approach” of derma rolling means this treatment isn’t nearly as safe or effective.

    According to Healthline, the potential risks include permanent scarring and darkening of the skin. Without proper sterilization, derma rolling also comes with a risk of infection. Some dermatologists express concerns about potential microtears and the risk of cheap rollers leaving tiny needle particles in the skin. Because of the risk of irritation, derma rollers are a no-go for those with eczema and dermatitis. Plus, as the rolling movement can spread bacteria around the face, derma rolling is especially risky for those with acne or cold sores. 

    Because these devices may reach nerves, blood vessels and other parts of the skin, even the FDA suggests leaving derma rolling to the professionals. Don’t try this one at home! Instead of derma rolling at home, always opt for professional microneedling treatments.

    Watch as our Lead Skin Care Trainer, Natalie Pergar, discusses these and other skin care trends that should be avoided. 


    If you’re looking for better ways to improve your skin, consider reaching out to an Eminence Spa Partner in your area to help you choose the right option.

    [ad_2]

    Source link