Category: Home & Kitchen

  • Eight airy interiors that draw on Mediterranean living

    Eight airy interiors that draw on Mediterranean living

    [ad_1]

    With summer in full flow, we have gathered eight residential and hotel interiors for our latest lookbook that each has a breezy and cooling Mediterranean style.

    Mediterranean interiors can often be defined by their minimal, paired back aesthetic that focuses on creating bright, airy and cool living spaces that offer an escape from the heat of the sun.

    White-washed walls, exposed brick and stone or terracotta floors typically serve as the basis for these interiors with furniture made from natural materials.

    From hotels in Greece built into caves to a home in a former ruin in France, here are eight interiors that are influenced by the Mediterranean.

    This is the latest in our lookbook series, which provides visual inspiration from Dezeen’s archive. For more inspiration see previous lookbooks featuring Barbie-pink interiors, rustic interiors and Wes Anderson-style interiors.


    MA House by Timothee Mercier from Studio XM
    Photo is by Simone Bossi

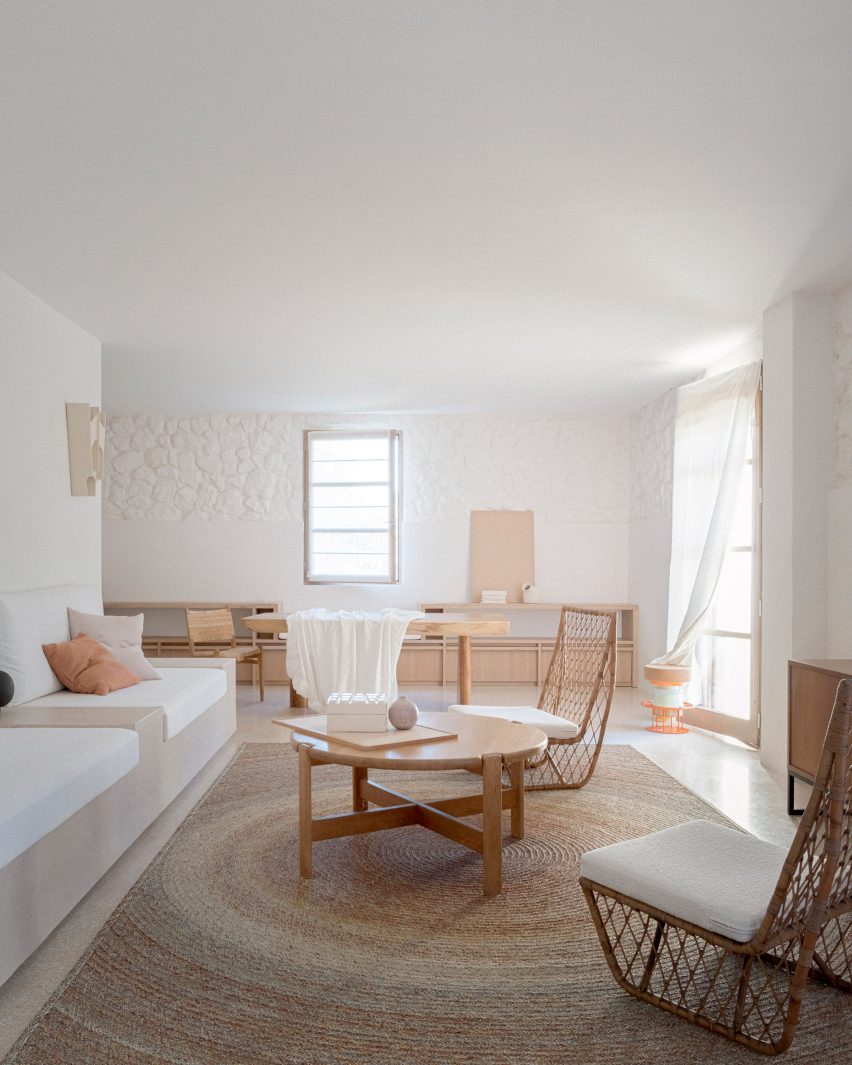
    MA House, France, by Timothee Mercier

    Architect Timothee Mercier of Studio XM converted this former ruined farm building in Vacluse, France into a home that aimed to honour the original features of the building.

    The interior of the home was blanketed in white, covering its walls and exposed stone surfaces. The space was sparsely decorated with light wood furnishings and natural materials to give the interior a Mediterranean feel.

    Find out more about MA House ›


    Casa A690 by Fino Lozano
    Photo is by César Béjar

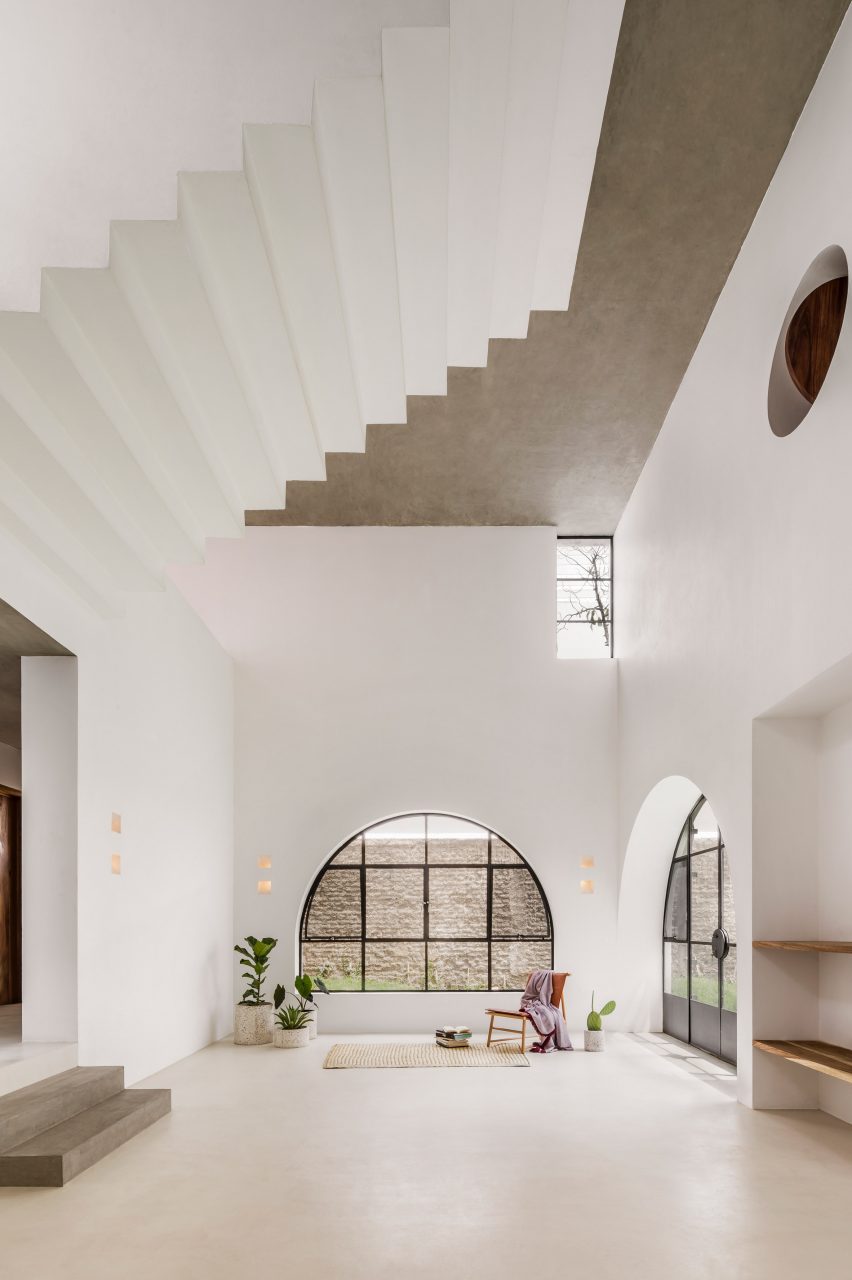
    Casa A690, Mexico, by Delfino Lozano

    Named Casa A690, this three-storey building dates back to the 1970s. It was renovated by Mexican architect Delfino Lozano who looked to combine Mediterranean and Mexican aesthetics.

    “We use the term Mexiterraneo to describe the materials and feeling we try to give our projects, in which we interpret the Mediterranean architecture – simple, pure materials – and mix it with our Mexican traditional architecture,” said Lozano.

    Find out more about Casa A690 ›


    Berlin summer loft by Loft Szczecin
    Photo is by Karolina Bąk

    Berlin summer loft, Germany, by Loft Szczecin

    Polish studio Loft Szczecin looked to historic Mediterranean architecture when overhauling the interior of this apartment in the suburbs of Berlin.

    The brick walls of the home were painted white while the floors of the interior were finished with old bricks that were sourced from industrial demolitions across Poland. Throughout the apartment, doors were removed to create more of an open-plan interior.

    Find out more about Berlin summer loft, ›


    Pura Comporta by Falcão de Campos
    Photo is by Fernando Guerra

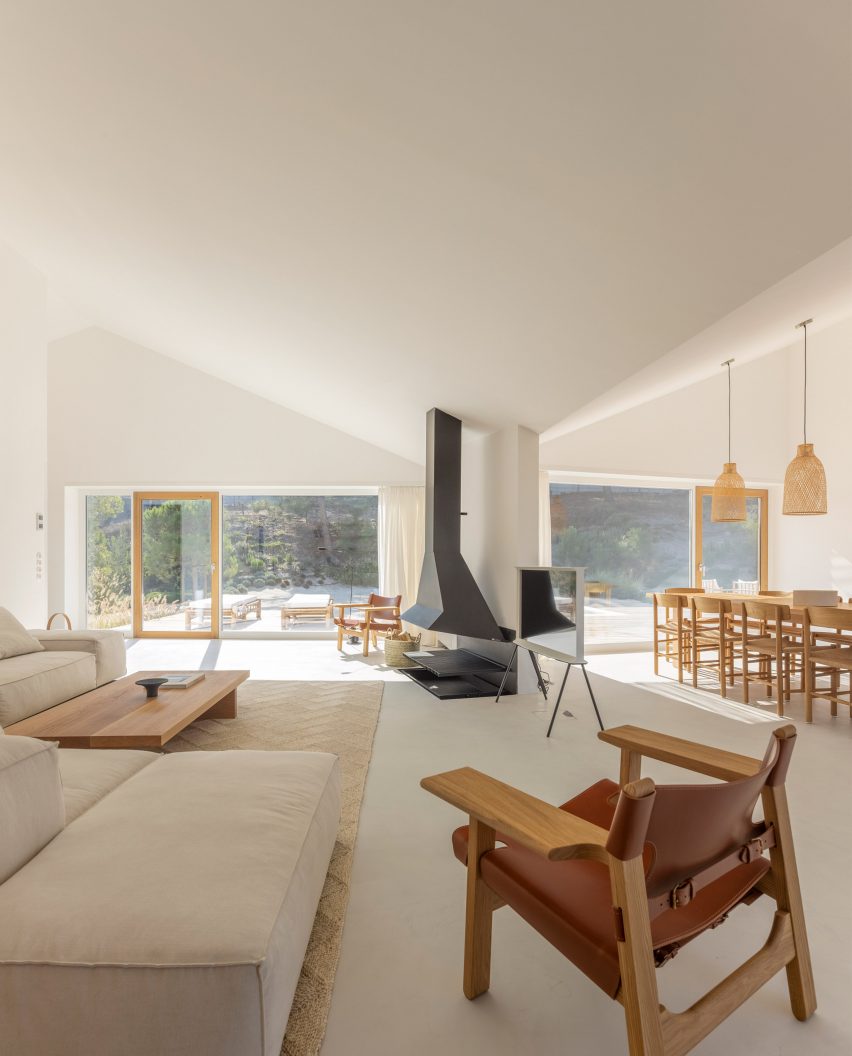
    Pura Comporta, Portugal, by Falcão de Campos

    In Portugal, Lisbon studio Falcão de Campos implemented a Mediterranean-informed interior scheme throughout this triple-pitched roof beach house.

    White walls were paired with minimal architectural detailing and finishes to achieve a Mediterranean look. A natural-toned rug was used to zone the living area, while a 10-person wooden table occupies the dining area of the home.

    Find out more about Pura Comporta ›


    Saint Hotel by Kapsimalis Architects
    Photo is by Giorgos Sfakianakis

    Saint Hotel, Greece, by Kapsimalis Architects

    Greek architecture studio Kapsimalis Architects transformed a series of former homes, barns and cellars on the island of Santorini into a hotel with rooms in caves.

    The interior was designed to match the all-white exterior of the hotel. Each of the rooms features an almost all-white finish with the exception of their poured concrete floors and furnishings.

    Find out more about Saint Hotel ›


    Summer house on the mountain by Kapsimalis Architects

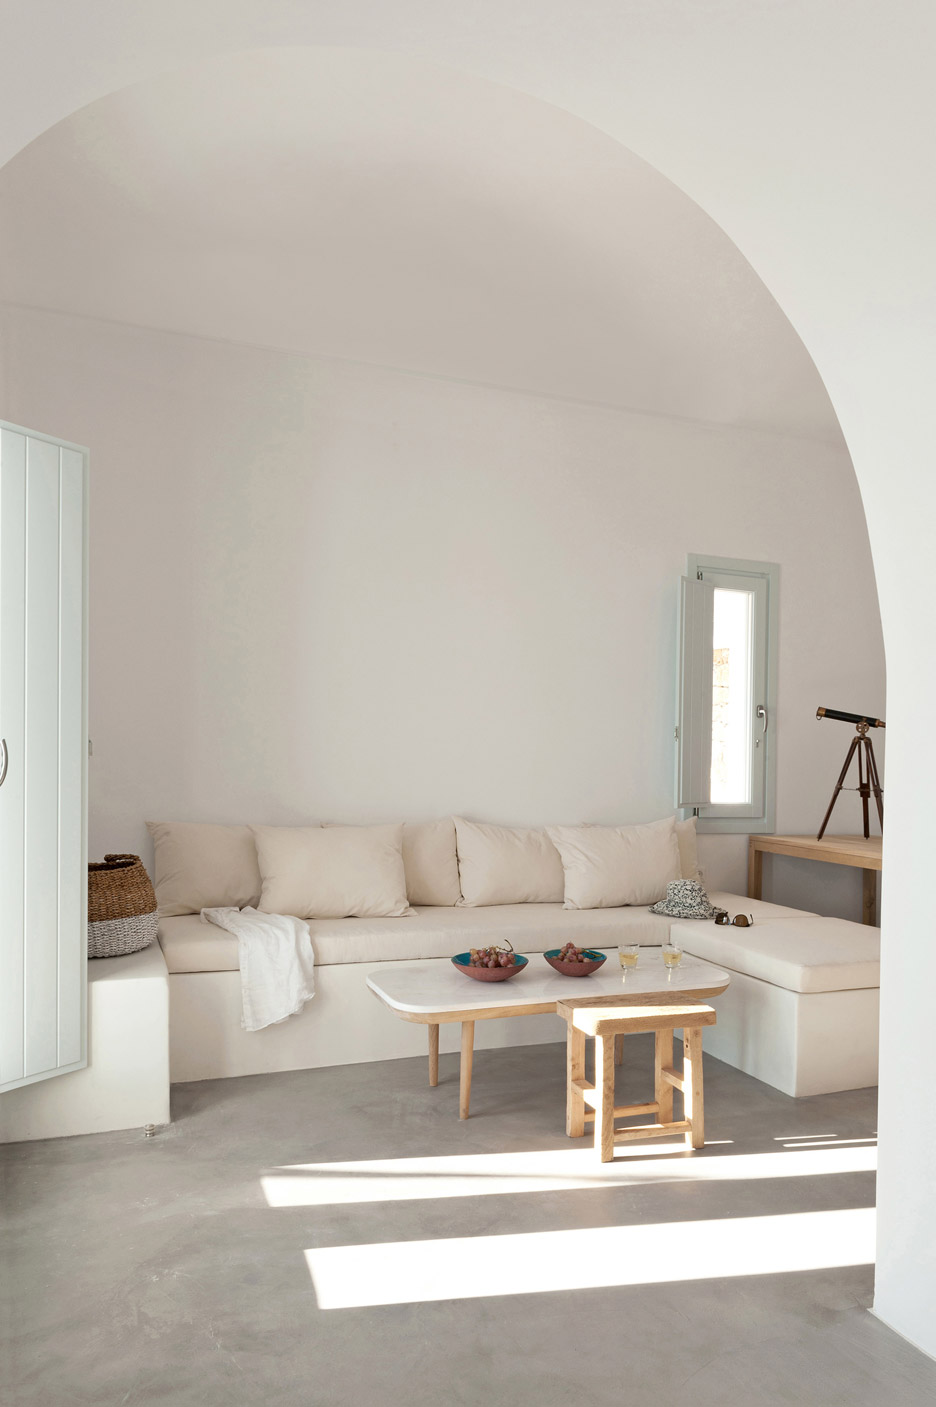
    Summer house, Greece, by Kapsimalis Architects

    Large arched openings add character to the open-plan interior of these Santorini apartments, which were designed by Kapsimalis Architects.

    Throughout the space, small, wood-framed windows pierce the walls and furniture was organised sparsely.

    Find out more about summer house›


    Las 3 Marías by Bajet Giramé and Nicolas Burckhardt
    Photo is by José Hevia

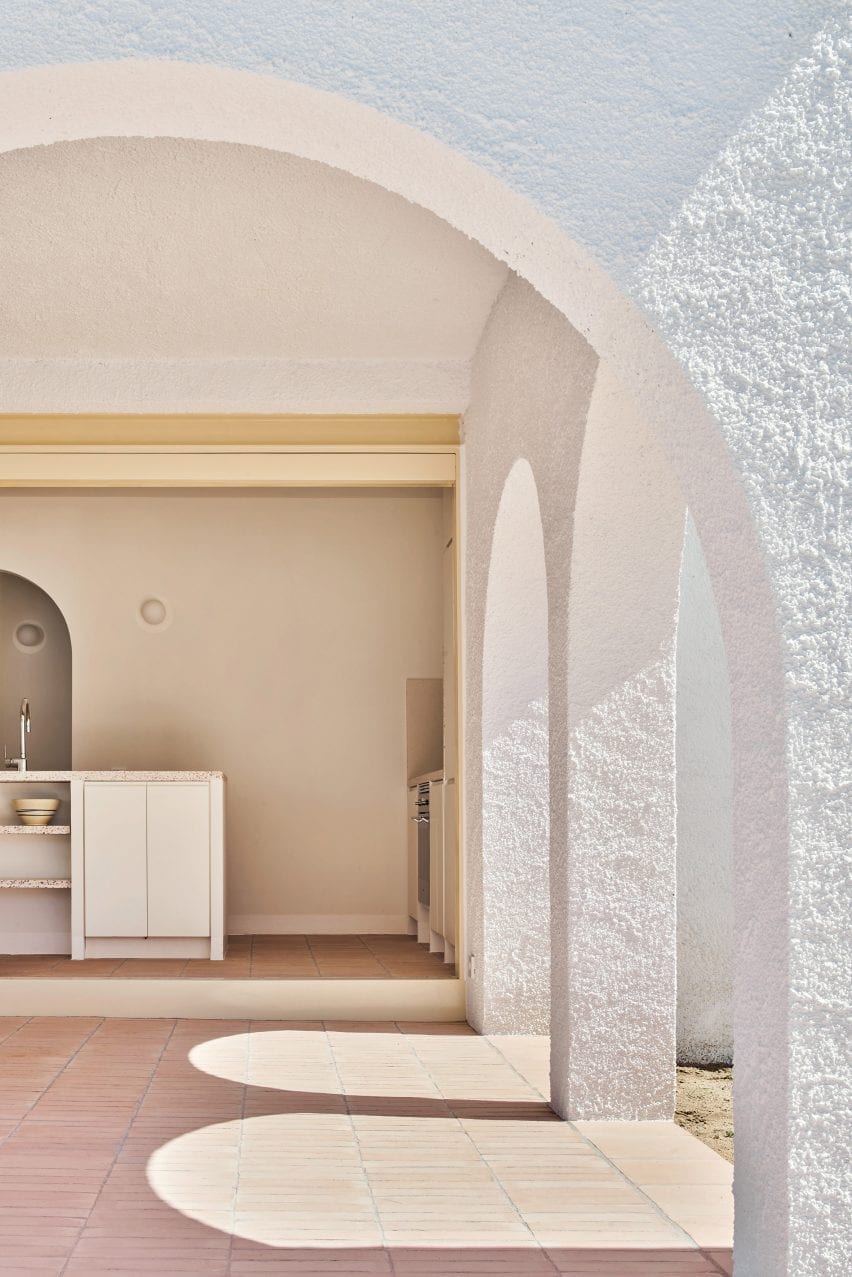
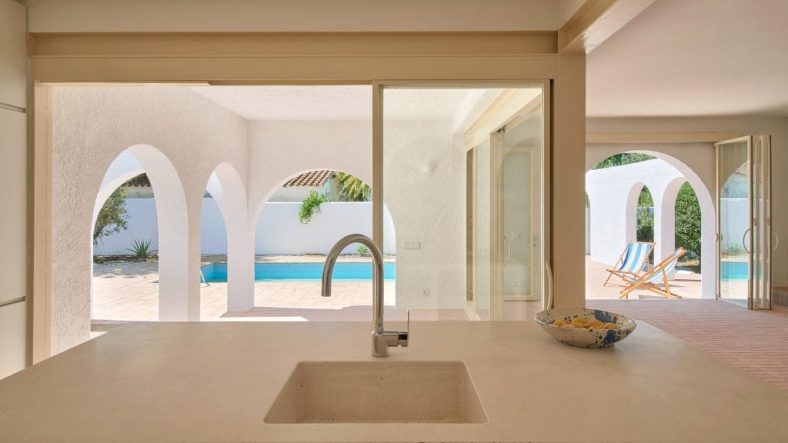
    Las 3 Marías, Spain, by Bajet Giramé and Nicolas Burckhardt

    Terracotta tile floors, large arched openings and bi-folding glass doors blend the boundaries of the interior and exterior at this Spanish holiday home, which was designed by Bajet Giramé and Nicolas Burckhardt.

    Much like homes found across the Mediterranean, white stucco covers its walls and Valencian terracotta tiles run through both the interior and exterior.

    Find out more about Las 3 Marías ›


    Woorak House in Palm Beach, Sydney designed by CM Studio
    Photo is by Prue Ruscoe

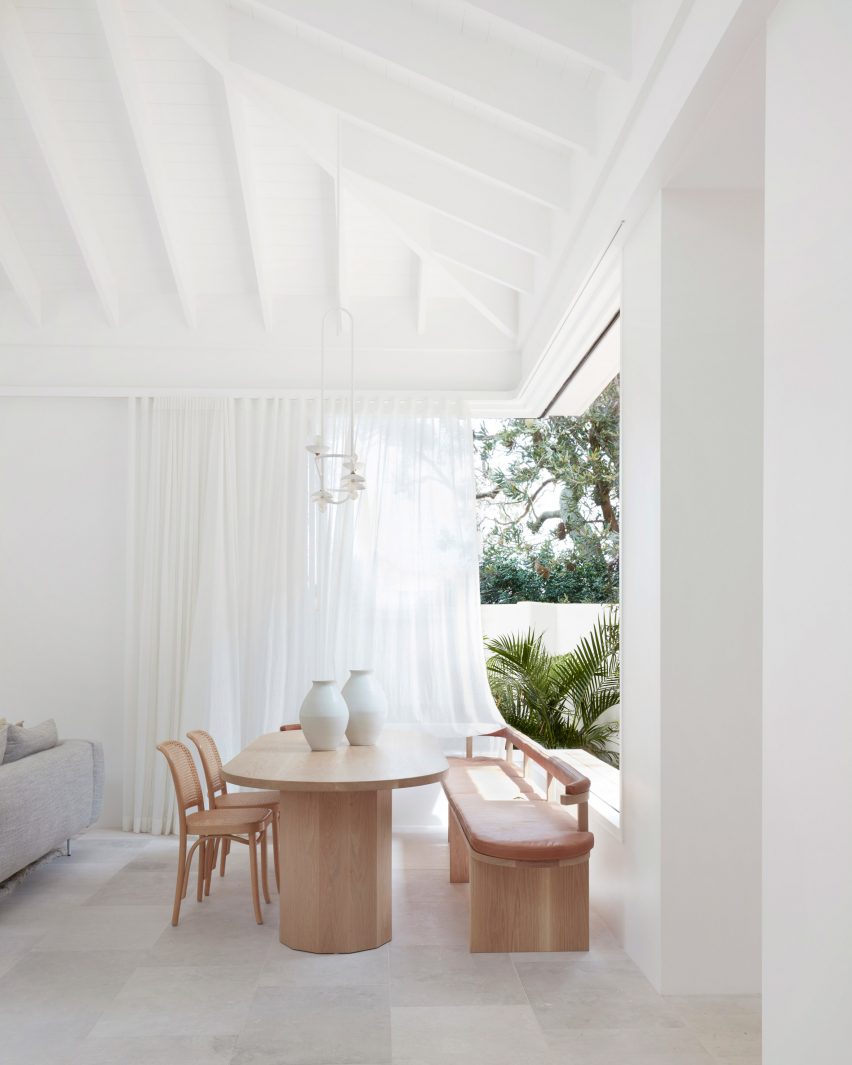
    Woorak House, Australia, by CM Studio

    CM Studio looked to bring a coastal, Mediterranean feel to the interior of this home in Australia through the use of a paired back interior palette and natural materials such as wood, stone and paper.

    In the dining room, a wooden table, chairs and bench were placed beside a glazed corner of the home beneath exposed beams that run through the home.

    Find out more about Woorak House ›

    This is the latest in our lookbook series, which provides visual inspiration from Dezeen’s archive. For more inspiration see previous lookbooks featuring Barbie-pink interiors, rustic interiors and Wes Anderson-style interiors.

    [ad_2]

    Source link

  • Tips for a Timeless Kitchen Remodel

    Tips for a Timeless Kitchen Remodel

    [ad_1]

    Redecorating, rearranging, or reselling… all are hard to manage if your kitchen can’t keep up with the trends that naturally change over time. Many people purchase a home, dislike their kitchen, have it remodeled, and then 5-10 years down the road, no longer love the kitchen. Materials customers chose years ago may no longer be in style, and their space can start to look dated, or their design taste has changed. They want something fresh and modern. But remodeling a kitchen usually comes at a hefty price. Starting all over again is exhausting and expensive. Getting it right with a timeless look will save you time and money in the future and boost your return on investment if you ever choose to sell your home. So, what elements can you add to your remodel to ensure a timeless style that fits many different tastes? Keep reading to find out! 

    (more…)

  • Pros and Cons of Butcher Block Counters

    Pros and Cons of Butcher Block Counters

    [ad_1]

    Learning the pros and cons of butcher block counters can help you decide if this is the right material for your kitchen. While these wood counters add a natural look to any space, they require ongoing maintenance, which is a deterrent for some buyers.

    The Pros and Cons of Butcher Block Countertops

    The Pros and Cons of Butcher Block Countertops

    Butcher block counters are strips of wood bound to each other. They come in several species and at price points ranging from $25-$300 per square foot. While these counters are popular, they’re not a good choice for every kitchen. Here’s a look at the pros and cons.

    Pro: Butcher Block Adds Natural Beauty to a Kitchen

    Since butcher block countertops are a natural material, they can evoke a sense of earthiness in your kitchen. They also coordinate well with other wood tones and can add warmth to a cooler color palette.

    Con: Butcher Block Countertops are Prone to Water Damage and Dings

    Butcher block countertops consist of wood strips, which are porous. If you don’t keep up with sealing your counters, they can absorb moisture, causing them to expand and contract. Likewise, if your home suffers from low humidity, your butcher block can dry out and warp.

    While butcher block is a popular cutting board material, it’s also prone to knife marks and dings. If you cut directly on the counter, it will leave many imperfections.

    Pro: Butcher Block is Customizable with Multiple Wood Species to Choose From

    Butcher block comes in a range of wood species with varied grain patterns and colors. The most common species of butcher block include Maple and Acacia, which are moderately priced and light-toned. You can also opt for darker species like Walnut, Teak, or Cherry for a different look.

    Con: Butcher Block Can Be High Maintenance

    You must seal your butcher block on a regular basis to keep it from absorbing moisture, warping, and staining. The most common butcher block sealer is mineral oil. While mineral oil is food safe, it requires frequent application – at least every 2 to 4 weeks.

    Other butcher block sealer options are available, but not all are food-safe. One of the longest-lasting food-safe sealers is WaterLox which can last several years.

    Pro: You Can Refinish Butcher Block, Making it Last for Decades

    One of a butcher block’s best qualities is that you can refinish it. When your counters look scuffed up, dry, or faded, you can sand them down and then stain or reoil. 

    There are even butcher block-friendly stain + oil combos available that dry to a food-safe finish, allowing you to change the color of your wood counters.

    Con: Butcher Block is Not Heat Resistant

    Be careful before you put a scorching hot pan on your butcher block. Wood countertops are not heat resistant and can show burn marks. Make sure to put down a potholder before setting hot pots and pans on the counter.

    The good news is you can sand out any imperfections or burn rings.

    Pro: DIYers Can Install Butcher Block

    Butcher block countertops are an excellent money-saving option for DIYers. Since countertop installation ranges from $50-$100 per hour, installing your own butcher block can cut costs.

    [ad_2]

    Source link

  • 2LG Studio brings colour and personality into London family home

    2LG Studio brings colour and personality into London family home

    [ad_1]

    Ornately corniced ceilings were preserved and painted pastel inside this detached Edwardian house in southeast London, which local firm 2LG Studio has renovated for a returning client.

    Set in the leafy residential area of Forest Hill, the house on Sunderland Road belongs to a couple who needed space for their three young children to grow and play.

    Hallway of Sunderland Road house
    2LG has completed Sunderland Road house in Forest Hill

    “Having designed this couple’s previous home, we had a strong sense of their tastes and wanted to evolve that for them in this house,” 2LG Studio founders Jordan Cluroe and Russell Whitehead told Dezeen.

    “We wanted to bring out their characters by emboldening their love of colour and finding ways to build pattern and joy into the materiality of the home,” the duo added.

    “The intent here was to respect the period elements of the building, whilst reflecting the modern style of the family who live there.”

    Open-plan living room and kitchen in London house by 2LG
    Hand-printed wallpaper by Custhom Studio features in the lounge and hallway

    Throughout the house, playful elements are in balance with a more serious aesthetic.

    Instead of treating the home’s elaborate ceiling mouldings separately – as tradition dictates – 2LG Studio applied a colour-block philosophy and painted them in the same pastel tones used across the upper walls and ceilings.

    The studio drew on a range of references for the interior, from 1980s colours to Italian design elements such as marble and Murano glass lighting, all the way to the Scandinavian influences seen in the natural materials and minimalist approach to furnishing.

    Kitchen and dining room of Sunderland Road house
    The kitchen is defined by sky-blue cabinetry and marble countertops

    Creating impact in the entrance hall is a hand-printed wallpaper, designed by 2LG Studio with long-term collaborator Custhom Studio and used here in a bespoke calamine-pink colourway that’s repeated in the connecting spaces throughout the house, as well as in the rear living area.

    “It creates a welcoming, human feel as soon as you enter,” the design team said.

    This ballet-slipper colour is paired with a brighter candy pink, bringing calm and warmth to the overall scheme.

    Lounge of Sunderland Road house
    2LG painted ceilings, mouldings and upper walls in pastel colours

    Pink-heavy palettes have become a signature for 2LG, also reflected in the natural pink undertones of the extra-wide Douglas fir floorboards that feature throughout the house alongside a grey poured-resin floor in the kitchen.

    “The floorboards set the tone with a nod to Scandi minimalism, adding a natural soul throughout that unites the bolder elements,” said 2LG Studio.

    In the kitchen, sky-blue cabinetry is used alongside marble countertops and splashbacks, with arched forms uniting the two finishes while pink elements such as bar stools pop against this calm backdrop.

    “The colours are a key part of the atmosphere and identity of this house,” said 2LG. “The blues gets deeper and bolder as you move upstairs into the study and the family bathroom.”

    “Primary red details give structure to the colour palette in the living room. Pastel green in the baby’s room is serene and fresh, warmed up with a mix of wood tones and creams.”

    Bedroom of house in London by 2LG
    Pink details feature throughout the home’s interiors

    The project features bespoke joinery including a playhouse on stilts in one of the kids’ rooms alongside existing 2LG pieces such as the Luca bedhead in the loft bedroom and the Tilda sofa, both designed for London furniture company Love Your Home and upholstered here in Kvadrat x Raf Simons fabric.

    “The fitted elements of the furniture give a sense of coherent design and function to the spaces whilst the classic design pieces bring a curated gallery feel, not unlike a contemporary luxury fashion store,” said 2LG Studio.

    Children's bedroom of house in London by 2LG
    2LG designed custom joinery including a stilted playhouse

    Various recycled materials provide textural interest throughout the house, among them the recycled plastic wall lights in the living room by Spark and Bell.

    2LG Studio also added a pink Foresso top made using waste wood chips and resin to the dining table, while the bespoke bathroom cabinet was made using leftover Douglas fir floorboards with recycled plastic details by UK company Smile Plastics.

    Children's bedroom in Sunderland Road house
    Pastel green was used to finish the baby’s room

    Since Cluroe and Whitehead founded their design practice in 2014 under the name 2 Lovely Gays, the studio has completed a number of residential projects in the British capital.

    Among them is the couple’s own home and office – to which they recently added a garden pavilion with a “touch of Beetlejuice” – and an equally colour-led renovation of a period property in the Heaver Estate conservation area.

    The photography is by Megan Taylor.

    [ad_2]

    Source link

  • Iconic TV Kitchens: The OC

    Iconic TV Kitchens: The OC

    [ad_1]

    From the minute we saw Ryan Atwood on our screens, we fell in love with his rough exterior, accompanied by a sweet, scared young man without a path of his own to follow. Enter the Cohen family, led by Ryan’s public defender, Sandy Cohen accompanied by his sweet wife Kirsten and spunky son Seth. They are a one-of-a-kind bunch, living among the filthy rich in Orange County, California. One of the most shell shocking parts of watching the show for the first time is the grandiose size of the home that the Cohen family lives in. And Ryan was just as floored as we were the moment we saw it.  

    (more…)

  • 10 Examples of Butcher Block Counters with White Cabinets

    10 Examples of Butcher Block Counters with White Cabinets

    [ad_1]

    Butcher blocks counters with white cabinets is a classic combination that can look traditional, rustic, or modern, depending on the rest of the kitchen design.

    1. Farmhouse Kitchen with a Butcher Block Island and White Cabinets

    Farmhouse Kitchen with a Butcher Block Island and White Cabinets

    The designers of this kitchen chose a honey-colored butcher block for this white farmhouse kitchen. The wood tones add warmth and coordinate with the flooring. If you’re not ready to install all wood counters, using it as your island material is a great way to bring texture to the space.

    2. Walnut Butcher Block Against Stark White Cabinetry

    Walnut Butcher Block Against Stark White Cabinetry

    While light butcher block counters are more common, a dark color can add contrast and a rich tone to the room. The walnut island contributes to the high-end feel of the kitchen and breaks up the white cabinets, counters, and backsplash.

    3. Transitional Kitchen with Butcher Block Counters and White Cabinets

    Transitional Kitchen with Butcher Block Counters and White Cabinets
    Gregory Dedona Architect

    Transitional style bridges the gap between modern and traditional, which is evident in this kitchen. The counters and cabinets lend to a traditional look, while the modern light fixture adds interest. 

    4. Modern Design with a Butcher Block Island

    Modern Design with a Butcher Block Island
    Evens Architects

    In a cool-toned modern kitchen, a wooden counter adds warmth and contrast. These homeowners opted for a medium-toned butcher block for the hub of the kitchen, which is surrounded by sleek gray counters and stainless steel finishes.

    5. Butcher Block and Marble Combo

    Farmhouse Kitchen with a Butcher Block Island and White Cabinets
    Modelremodel

    The designers of this kitchen opted for a unique take on transitional decor, incorporating classic finishes like marble and wood with a busy, modern backsplash. Even though the butcher block counter is small, it contrasts with the marble waterfall countertops, drawing attention to both.

    6. Modern Eclectic Butcher Block Kitchen

    Modern Eclectic Butcher Block Kitchen

    It’s evident that wooden countertops work for farmhouse and traditional spaces, but they look just as good in this eclectic-style kitchen. The light butcher block stands out among the dark-colored back cabinets and provides a place to enjoy a meal at the breakfast bar.

    7. Classic Kitchen with White Cabinets

    Farmhouse Kitchen with a Butcher Block Island and White Cabinets
    Yunker Associates Architecture

    The small dose of butcher block coordinates with the floors and hutch in this classic kitchen. If you aren’t ready to replace all your counters, consider a small island addition like this. The wood brings in textures, and you can tailor the color to suit your space.

    8. Light and Airy Kitchen Design

    Light and Airy Kitchen Design
    SchappacherWhite Architecture D.P.C.

    Even though this room is small, the light and airy look of butcher block counters with white cabinets makes it seem spacious. The light wood floors and minimal decor help make this space feel bright and cheery. Use this room as inspo for a natural-looking kitchen.

    9. Contemporary Kitchen Design with a Butcher Block Island

    Contemporary Kitchen Design with a Butcher Block Island

    The blue backsplash brightens up this white kitchen with white cabinets. The homeowners added a light color butcher block counter for the island, adding texture to the room. 

    10. Simple White Kitchen with Wood Counters

    Farmhouse Kitchen with a Butcher Block Island and White Cabinets

    Aside from the butcher block counters and stainless steel appliances, everything in this room is white. If you prefer a simple white-on-white style, adding butcher block can break up the room and add a natural touch.

    [ad_2]

    Source link

  • Michael Hsu utilises soft shapes for Austin skyscraper interiors

    Michael Hsu utilises soft shapes for Austin skyscraper interiors

    [ad_1]

    US studio Michael Hsu Office of Architecture has designed the common areas and amenity spaces for a residential skyscraper in Austin, Texas, which include a circular outdoor swimming pool.

    The 51-storey 44 East Avenue development on the city’s riverfront was designed by Page Architects, and includes 330 condominiums and a variety of shared amenities for residents.

    Lounge area in front of glazed atrium
    The ground-floor lobby of 44 East Avenue includes a glazed atrium that divides the space

    Local studio Michael Hsu Office of Architecture took an organic approach when designing the communal spaces, introducing soft shapes and natural materials to the glass and concrete structure.

    “44 East combines nature and design with the idea of home,” said studio founder Michael Hsu. “It’s an unexpected expression of what beautiful, livable, modern spaces can be.”

    Dark green sofa, pale pink rug and wooden coffee table
    Michael Hsu Office of Architecture has layered a variety of vintage and custom furniture in the lobby

    The bright lobby features light colours, curved surfaces, and a blend of hard and soft materials.

    Poured concrete terrazzo floors are intended to echo the gravel of the nearby riverside trail, while plaster ceilings are subtly smooth-edged to mimic the undersides of boats.

    Rounded mint-green reception desk in front of white tambour wall
    A rounded mint-green reception desk sits in front of a white tambour wall

    A glazed atrium with curved corners divides the ground floor and brings the landscaping by DWG further into the building.

    Lounges on either side are furnished with a mix of vintage and contemporary pieces, which add colour and texture.

    Bright lounge space with a variety of seating areas
    On the 11th floor, spaces feature pastel tones to match the interiors of the residences

    The reception desk has rounded edges and sides, and a glossy mint-green finish. It sits on a chrome base that matches a custom pendant light over a nearby seating area.

    “[The communal areas are] a completely designed experience, one that allows for a multitude of ways of living,” Hsu said. “It represents creativity and design without pretension.”

    Circular swimming pool with loungers and seating around the perimeter
    A circular outdoor swimming pool has loungers and pebble-shaped islands at its shallow ends

    On the 11th floor, a series of spaces are oriented towards views of the Colorado River and the leafy neighbourhoods to the south.

    A circular outdoor swimming pool features loungers dipped into the shallow water and a series of pebble-shaped islands.

    Covered patio with a tree growing through a hole in the canopy
    A tree grows through a hole in the canopy that covers a patio area for grilling

    Adjacent is a partially covered patio for barbecuing and dining al fresco, oriented around a planter with a tree that grows up through a hole in the slatted canopy.

    Indoor spaces on this level are decorated in pastel hues to match those found in the residences, which were designed by Page.

    Further amenity areas on the 37th floor feature jewel tones and darker materials, such as the stone flooring, as well as fixtures including a large moon-like pendant light above a circular sofa.

    “We hope that this space feels both fresh and welcoming, a place that has new moments to discover, but that is comfortable and familiar,” said Hsu. “Design here is part of the resident’s everyday experience, rather than reserved for a special occasion.”

    Lounge with dark furniture and a view of the Austin skyline
    Another lounge on the 37th floor has darker decor and a view of the Austin skyline

    Austin continues to grow as a desirable place to live and work, and has seen a boom in development across residential, commercial and hospitality sectors as a result.

    Plans for a supertall skyscraper in the city were unveiled in November 2022, although cut back significantly six months later, leaving another supertall by KPF in the running to become Texas’ tallest building.

    Exterior view of 44 East Avenue with the Colorado River and Austin skyline behind
    44 East Avenue is located beside the Colorado River, east of Downtown Austin

    Meanwhile, a concrete office complex, a sculptural tower, and a technologically advanced sports arena have all been completed in Austin over the past year.

    Michael Hsu Office of Architecture has also wrapped up a string of projects in its home state, from converting a 1930s Austin church into a design office to designing a cosy Japanese restaurant in Houston.

    The photography is by Chase Daniel.


    Project credits:

    Common areas/amenity spaces: Michael Hsu Office of Architecture
    Home interiors: Page
    Landscape architect: DWG
    Developer: Intracorp
    Pre-construction: Flintco
    Civil engineering: WGI

    [ad_2]

    Source link

  • Iconic TV Kitchens: Friends

    Iconic TV Kitchens: Friends

    [ad_1]

    Pheebs, Joe, Mon, Rach, Chanandler Bong, and… two divorces? You know them, you love them, and WE love their apartments!  

    (more…)

  • How to Stain Butcher Block Counters 

    How to Stain Butcher Block Counters 

    [ad_1]

    Staining butcher block counters can change the look of your kitchen and bring older wood back to life. Before staining, it’s essential to choose a food-safe product and a compatible sealer.

    Types of Butcher Block Stain

    There are three types of butcher block stain: water-based, oil-based, and one-step oil+stain combos. Be mindful of the product you pick, as you’ll need to find a wood conditioner and sealer with the same base. For example, if you use a water-based stain, you need a water-based wood conditioner and sealer.

    • Water-based butcher block stain – fast drying, simple application, and easy-to-find food-grade products.
    • Oil-based stain – penetrates wood deeper than water-based stains, and it’s easier to find compatible wood conditioners, but these stains aren’t always food-surface safe.
    • Oil + Stain combo – stain and seal your butcher block in one step and are food-grade when dry.

    No matter the stain you choose, ensure the product is food surface safe if you’ll be placing food directly on your counters. 

    Stain Butcher Block Countertop

    How to Prep Butcher Block Counters for Stain 

    The following tutorial will walk you through how to prep your butcher block for stain. Follow these steps regardless of the product you’re using unless otherwise specified.

    Step 1: Sand the Counters

    For brand-new, unfinished counters, use 120-grit sandpaper to correct any unevenness. 

    If your counters have a previous finish, use coarse 80-grit sandpaper to remove it and then switch to 120-grit sandpaper.

    After sanding with 120-grit sandpaper or a sanding sponge, give the counters a coat with 150-grit sandpaper. 

    Always sand in the direction of the wood strips.

    If you need to fix divots or cracks in your counters (more likely for older butcher block), collect all the dust from sanding with 120-grit paper and move to the next step.

    Step 2: Fill in Holes or Cracks (Optional)

    If your counters are older and have holes and cracks where food collects, fill the divots with food-safe wood glue and sanding dust. Use your dust from the previous step and mix it with the glue until a thick paste forms.

    Press the paste into holes and cracks, then use a scraper to level the glue with the countertop.

    After the paste dries, sand the counter again with 120-grit sandpaper followed by 150-grit, then wipe clean.

    Step 3: Smooth with 220-Grit

    Give your counters a final sanding with 220-grit sandpaper to leave a smooth finish.

    Step 4: Clean Off the Sanding Dust

    Remove all sanding dust with your Shop Vac or a tack cloth. Then wipe the counters with a cloth dampened in water to remove all traces of dust. Allow the counter to dry.


    How to Stain Your Butcher Block Counters with Water or Oil-Based Stains

    After prepping your counters by following the steps above, choose your stain product and a coordinating wood conditioner and sealer.

    Step 1: Apply Wood Conditioner to Your Counters

    Apply wood conditioner to your counters with a soft cloth or brush, depending on the package instructions. Allow the conditioner to dry for at least two hours, then sand it over with 220-grit sandpaper.

    Clean off all sanding dust.

    Note: Remember that your wood conditioner must share the same base as your stain.

    Step 2: Apply Your First Coat of Stain

    Follow the directions on the stain package to add your first layer. In most instances, you’ll use a natural bristled brush to evenly coat the counter, going in the direction of the wood strips. Cover the edges and underneath the counter for a uniform look.

    Allow the stain to dry for 6-8 hours or the specified time on the can.

    Step 3: Add a Second Coat

    Once the first coat is dry, follow the same steps to add a second coat. Be mindful of pooling and dripping.

    Allow the second stain to dry for at least eight hours. If you aren’t satisfied with the color of the counters, add a third coat once the second coat is dry.

    Step 4: Seal the Counters

    For the final step, you’ll need to seal your counters. The sealer you use must be compatible with the stain type. Remember to use a food-safe sealer if you’ll be doing any kind of food prep on your counters.

    • You can use most Waterlox products, which are a tung-oil and resin sealer, over top of water and oil-based stain.
    • Polycrylic works over water-based stains.
    • Polyurethane works over oil-based stains.

    Also, check the stain product you’re using. The brand may have a companion sealer for your butcher block counters.


    How to Stain Butcher Block with a Food Safe Oil + Stain Combo

    For those wanting an easier staining method, an oil + stain combo is your best bet. Consider a product like Watco Butcher Block Stain from Rustoleum. It’s non-toxic, food safe when completely dry, and eliminates the need for a separate sealer.

    Step 1: Prep the Countertops

    Before applying a food-safe oil + stain product, your counter must be in a raw-wood state. Use the prep steps above to sand your counters.

    Step 2: Apply the First Coat with a Soft Cloth

    Use a soft cloth to apply an even coat of stain, following the direction of the wood strips. Don’t forget the edges and underneath the counter. Wait at least six hours for the stain to dry.

    Step 3: Sand with 400 Grit Sandpaper

    In between coats, sand the counter with 400 grit sandpaper and wipe the sanding dust away with a soft, lint-free cloth.

    Step 4: Apply a Second Coat

    Use a soft cloth to apply a second coat of the product. Wait at least six hours, then inspect. If you’re satisfied with the finish, you can stop here. If you want a richer color, add another coat.

    Step 5: After 72 Hours, Wash and Use

    Wait 72 hours after your final coat. Then handwash your counters with gentle soap and water before using.

    [ad_2]

    Source link

  • “Architectural photography is dominated by empty, glossy, new buildings”

    “Architectural photography is dominated by empty, glossy, new buildings”

    [ad_1]

    Architectural photographer Jim Stephenson explains how The Architect Has Left The Building exhibition at RIBA aims to draw attention to how people use buildings, in this interview.

    Despite taking place at the Architecture Gallery at the Royal Institute of British Architects’ central London HQ, Stephenson told Dezeen that the exhibition is not focused on buildings.

    “The installation is about people watching,” he said. “Although it’s at the RIBA and in the architecture gallery, it’s not really about the buildings – they’re just the backdrop, they’re the stage set really.”

    “We wanted to create a meditative, large scale film piece that was all about how people use (and misuse) space once the architect’s work is done,” he continued.

    The Architect Has Left The Building exhibition at RIBA
    The Architect Has Left The Building is an exhibition at RIBA

    As the exhibition’s title suggests, the exhibition focuses on how buildings are used after the architect’s work is finished.

    It aims to show buildings in use, in contrast to the majority of architectural photography that often portrays buildings empty, at their point of completion.

    “When I used to work in architecture practices, we used to design everything around people and context,” explained Stephenson. “It felt like everything was dictated by those two things and then when we would get projects photographed we’d ask the photographer to omit those two things.”

    “The buildings were empty objects – sculptures,” he continued. “It always jarred with me, so in our work we focus on people using space as much as possible.”

    Jim Stephenson's RIBA exhibition
    The exhibition features the work of Jim Stephenson.

    The exhibition include numerous photos taken by Stephenson, along with an enclosed screening room, where a film created for the exhibition was played on a dual screen.

    “This film is all about the small interactions that occur in and around buildings – between individuals, groups of people and even between people and the buildings,” said Stephenson. “It’s all about the people!”

    The film, which was created with artist Sofia Smith and has a soundtrack created by Simon James, contains numerous contemporary buildings from the past 15 years.

    Among the buildings featured are Tintagel Castle Bridge by William Matthews Architects, Tate St Ives extension by Jamie Fobert, Sands End Arts and Community Centre by Mae Architects and London Bridge Station by Grimshaw, which were all shortlisted for the Stirling Prize.

    Dual screen showing film at RIBA
    The exhibition features a film screened on a dual screen

    The film makes aims to makes people think about the connections between buildings and how people are connected to them.

    “Watching Sofia make visual links between buildings that I hadn’t previously considered to have much in common was fascinating,” explained Stephenson.

    “There’s a point in the film where we transition from Sands End Community Centre to Tintagel footbridge and it’s seamless – from a community centre in West London to a bridge over the sea in Cornwall!”

    “And at London Bridge train station, Simon recorded not just the ambient sound that everyone can hear, but he also recorded the inner guts of the building with contact mics, as well as the sound in the electromagnetic spectrum,” he continued. “All those sounds get layered up in the show and I can’t go through that station now without thinking about them.”

    Photo exhibition of Jim Stephenson's work
    It also features photos taken by Jim Stephenson

    Stephenson hopes that the film will demonstrate how people improve architectural spaces and how they are recorded.

    “The history of architectural photography is dominated by empty, glossy, new buildings, photographed before people have come in,” said Stephenson.

    “I think there was a fear amongst architects that people ‘mess up their building’ and photographing them empty somehow showed the architecture in a more pure and distilled way,” he continued.

    “I think that’s mad. If the people you designed the building for are ‘messing it up’ then maybe there’s something wrong with the building? I’m half joking, but I’ve never documented a space that wasn’t improved by people, or at the very least a sign of life.”

    One of the UK’s best-known architectural photographers, Stephenson co-founded film production studio Stephenson& with Smith. Recent projects photographed by Stephenson include a wood-lined community space in east London, a rammed-earth yoga studio to the gardens of Somerset hotel and a rolling bridge in London.

    Recent buildings captured on film by Stephenson& include a visitor centre at the UK’s largest sawmill and a school theatre by Jonathan Tuckey Design in London.

    The photography is by Agnese Sanvito, unless stated. The film is by Jim Stephenson and Sofia Smith with soundtrack by Simon James.

    The Architect Has Left The Building is at RIBA in London until 12 August 2023. See Dezeen Events Guide for an up-to-date list of architecture and design events taking place around the world.

    [ad_2]

    Source link